

NoteBlend Mobile
The reviewer app for your phone, tablet, and desktop.
Offline. Private. Rule-Based. No AI. No account.
Open NoteBlend MobileOpens in your browser — use it right away. Add it to your home screen with the steps below to run it offline.
Installation & User Guide
Install on Android (Chrome)
Android and iOS follow the same principle: open NoteBlend in your browser, then add it to your home screen. Once added, it opens full screen with its own icon and works online or offline.
-
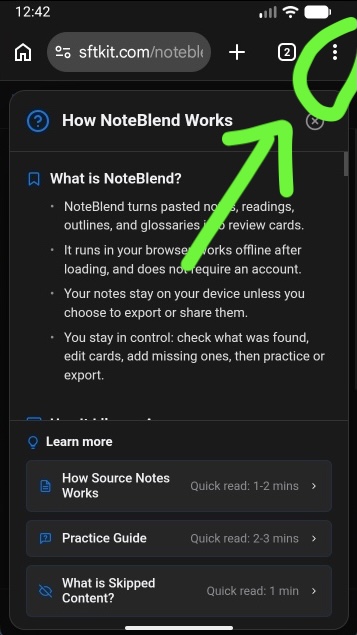
1. Tap the three-dot menu at the upper-right corner.
-
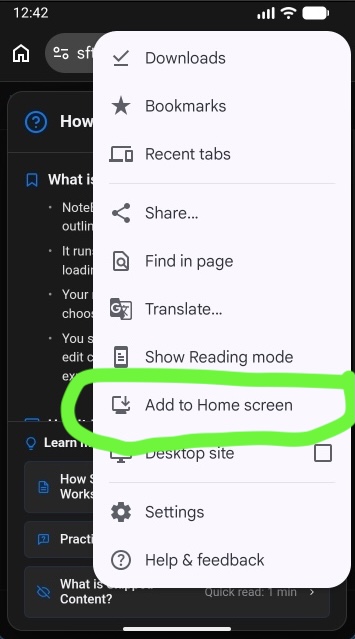
2. Tap "Add to Home screen".
-
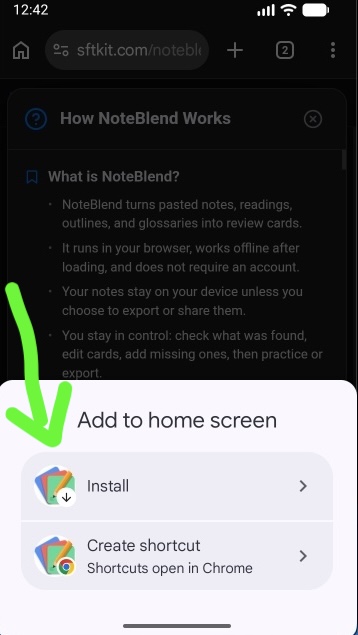
3. Tap "Install".
-
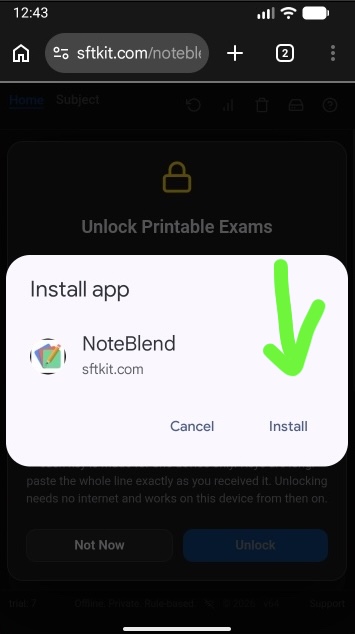
4. Confirm by tapping "Install" on the popup.
-
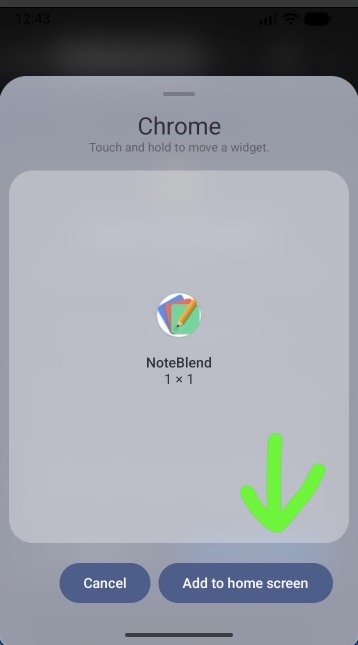
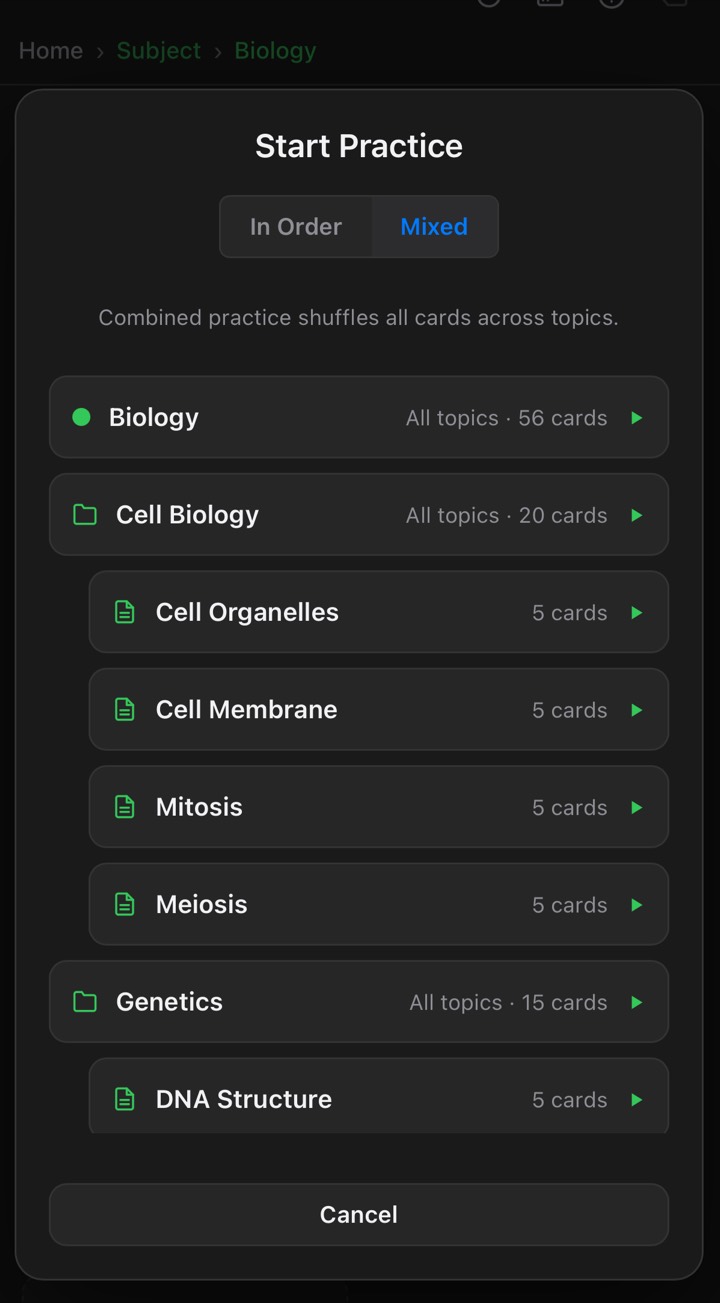
5. Tap "Add to home screen".
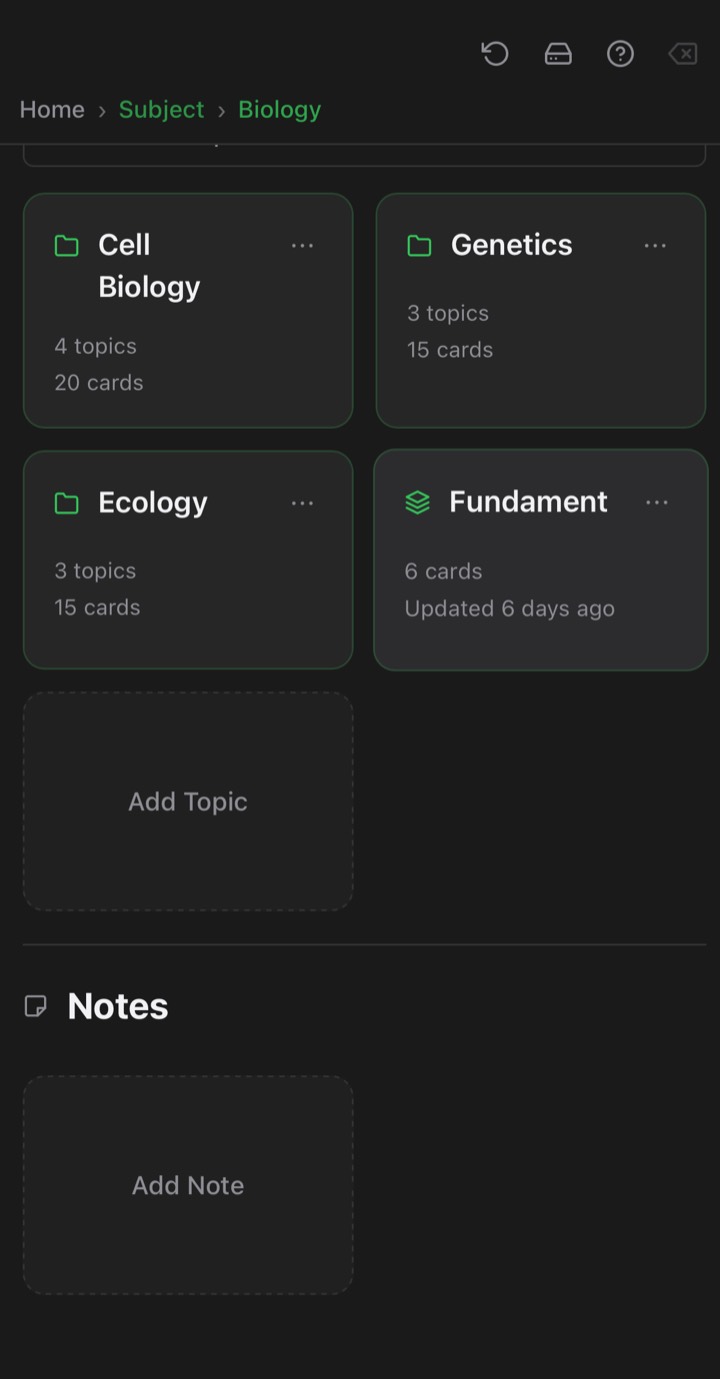
-
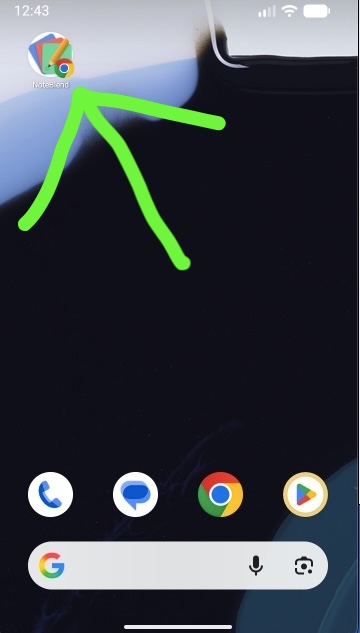
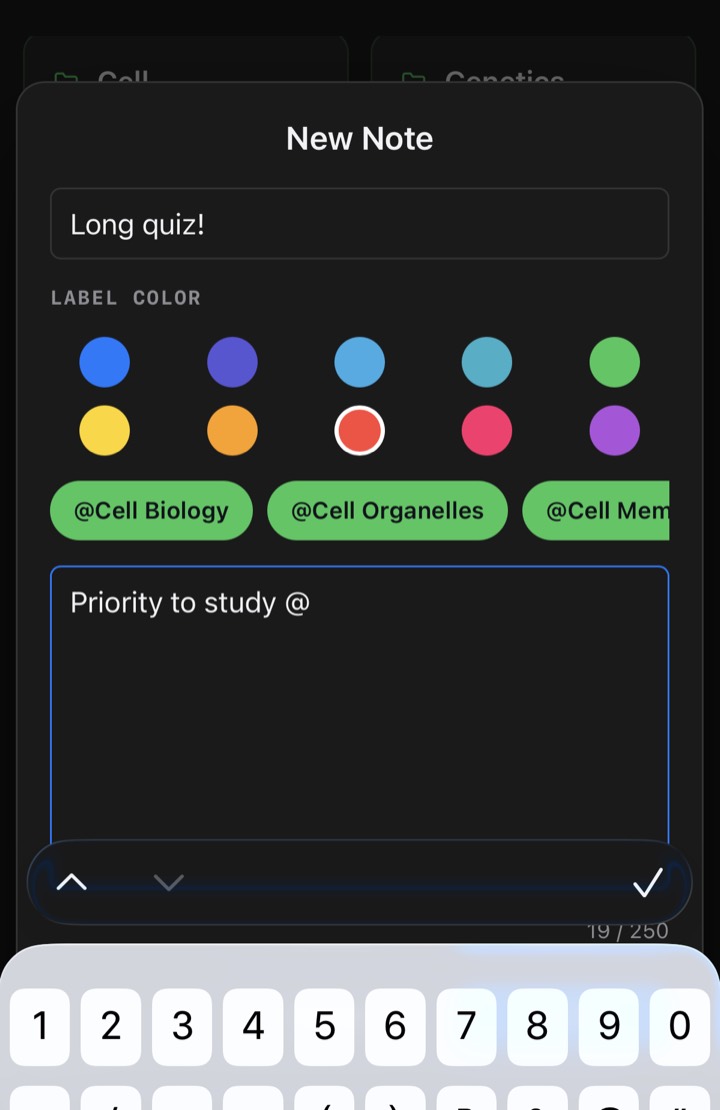
6. Done. Open NoteBlend from your home screen — it works online or offline.
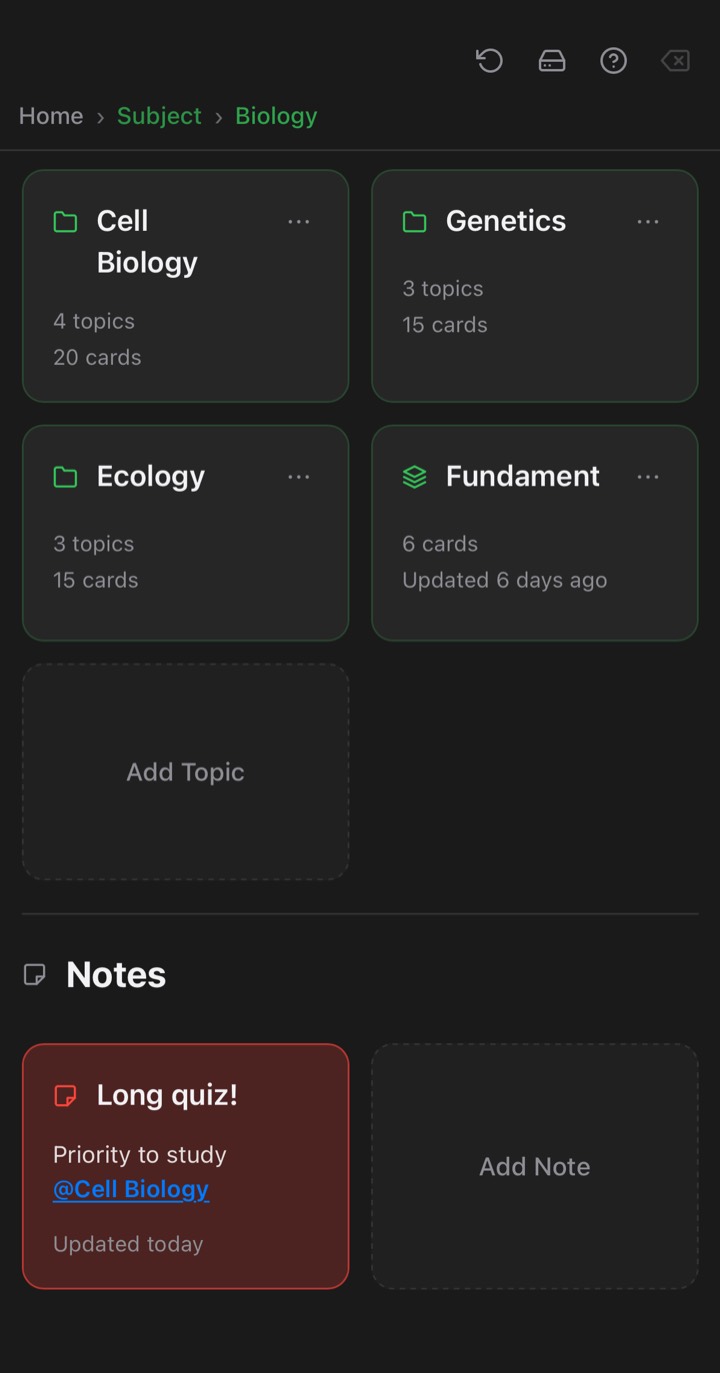
Using a different browser (Samsung Internet, Edge, Firefox)? Look for "Add to Home screen" or "Install" in its menu — the steps are the same.
If a "pop-up blocked" message appears
When printing exam packs, Chrome may block the print window. Allow pop-ups once and it will not ask again:
-
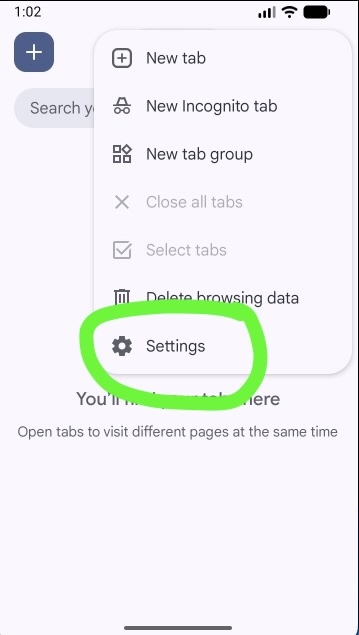
1. Open the browser menu and tap "Settings".
-
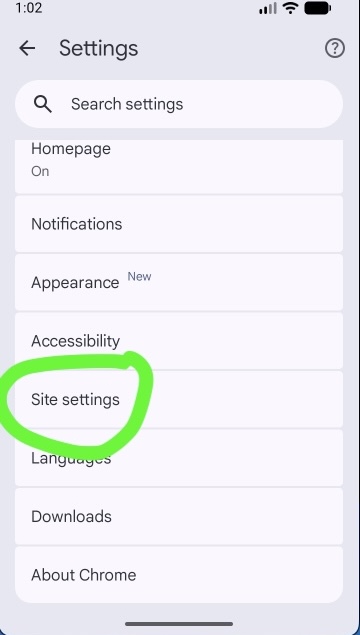
2. Tap "Site settings".
-
3. Tap "Pop-ups and redirects".
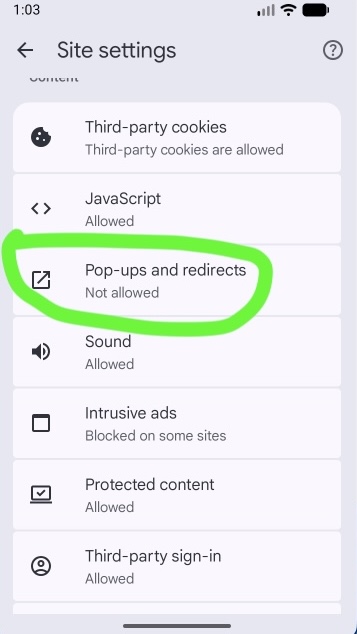
-
4. Select "Sites can send pop-ups and use redirects".
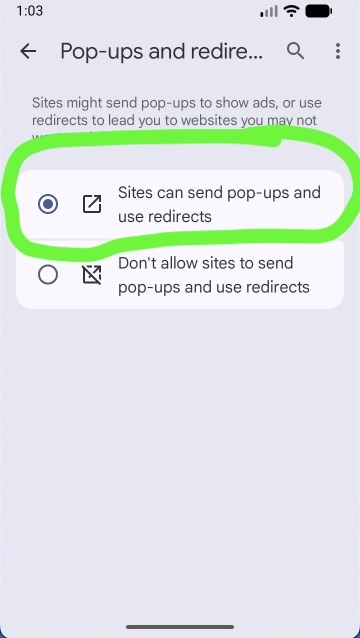
-
5. Go back and print again — the print preview now opens.
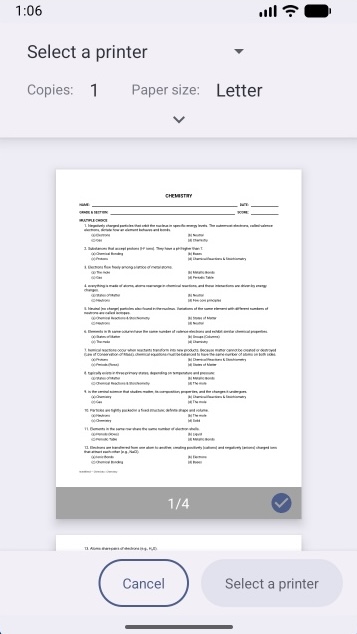
-
6. Your exam is ready to print.
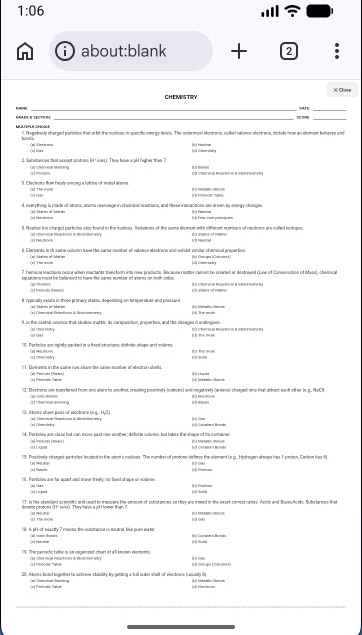
-
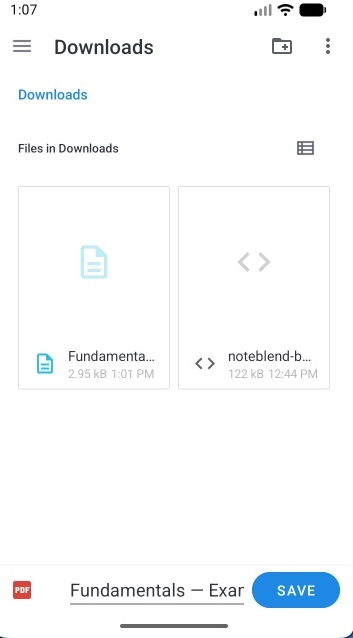
7. You can also save it as a file instead of printing.
Opened the link from Messenger?
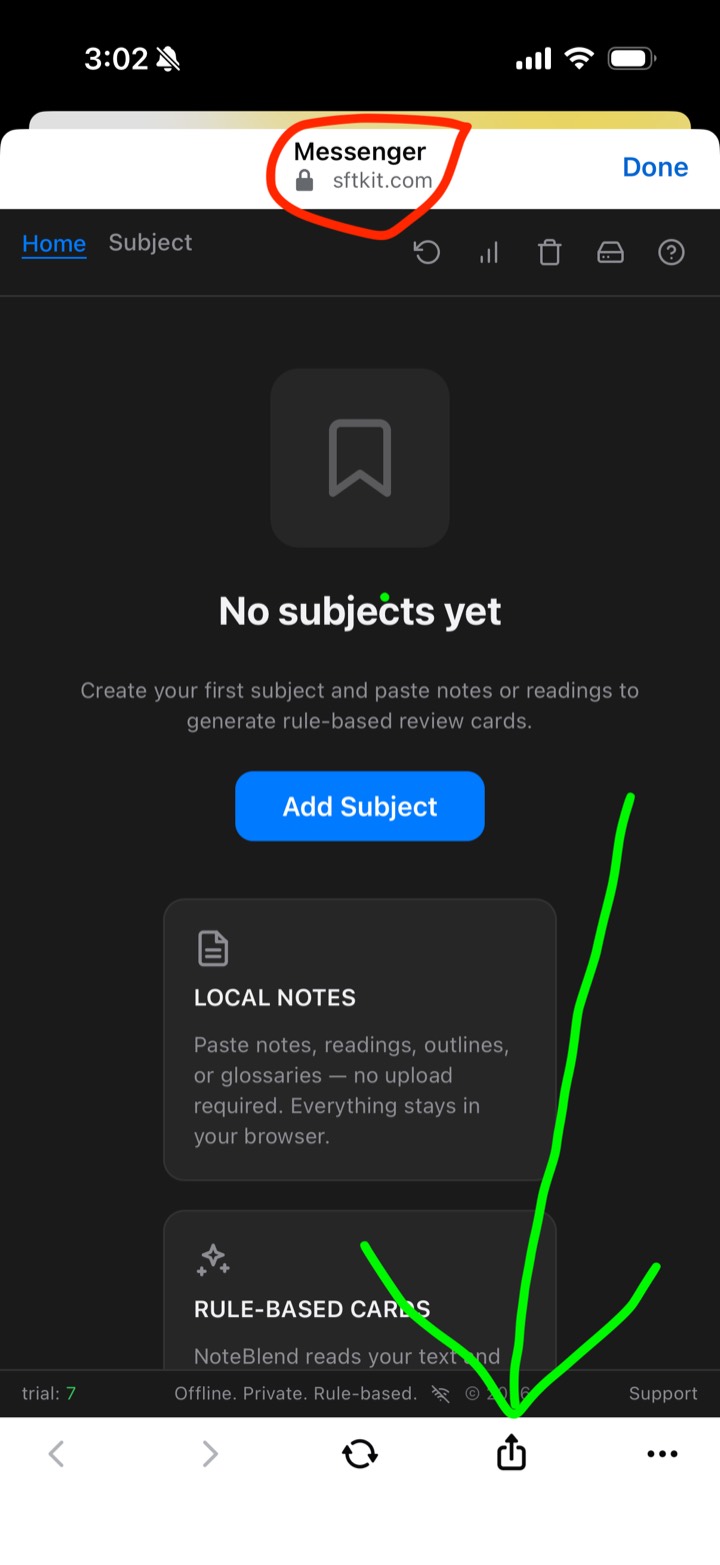
Messenger opens links in its own built-in browser. Move to a real browser first, then install as usual. This applies to both Android and iOS:
-
1. Tap the Share icon and choose "Open in Browser".
-
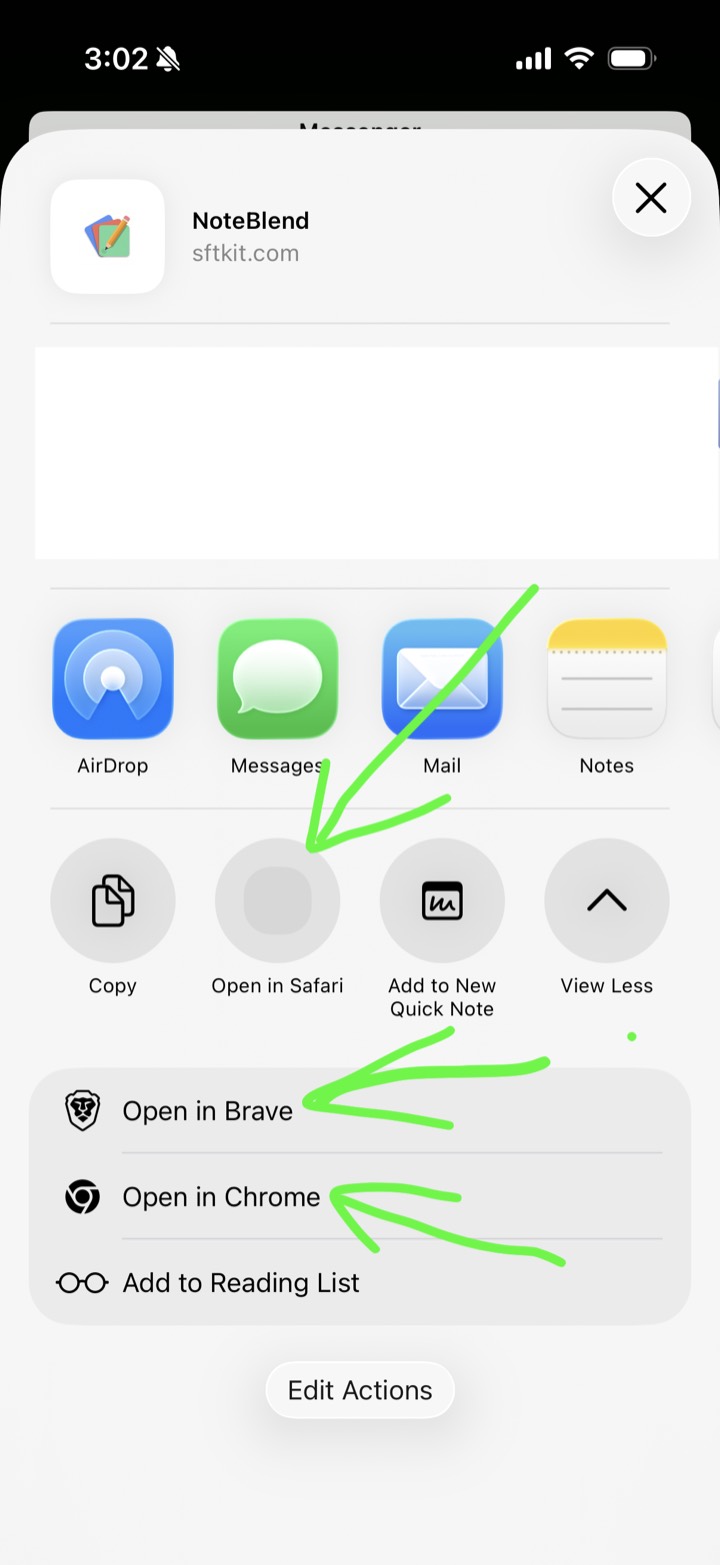
2. Choose your default browser, or any browser you prefer.
-
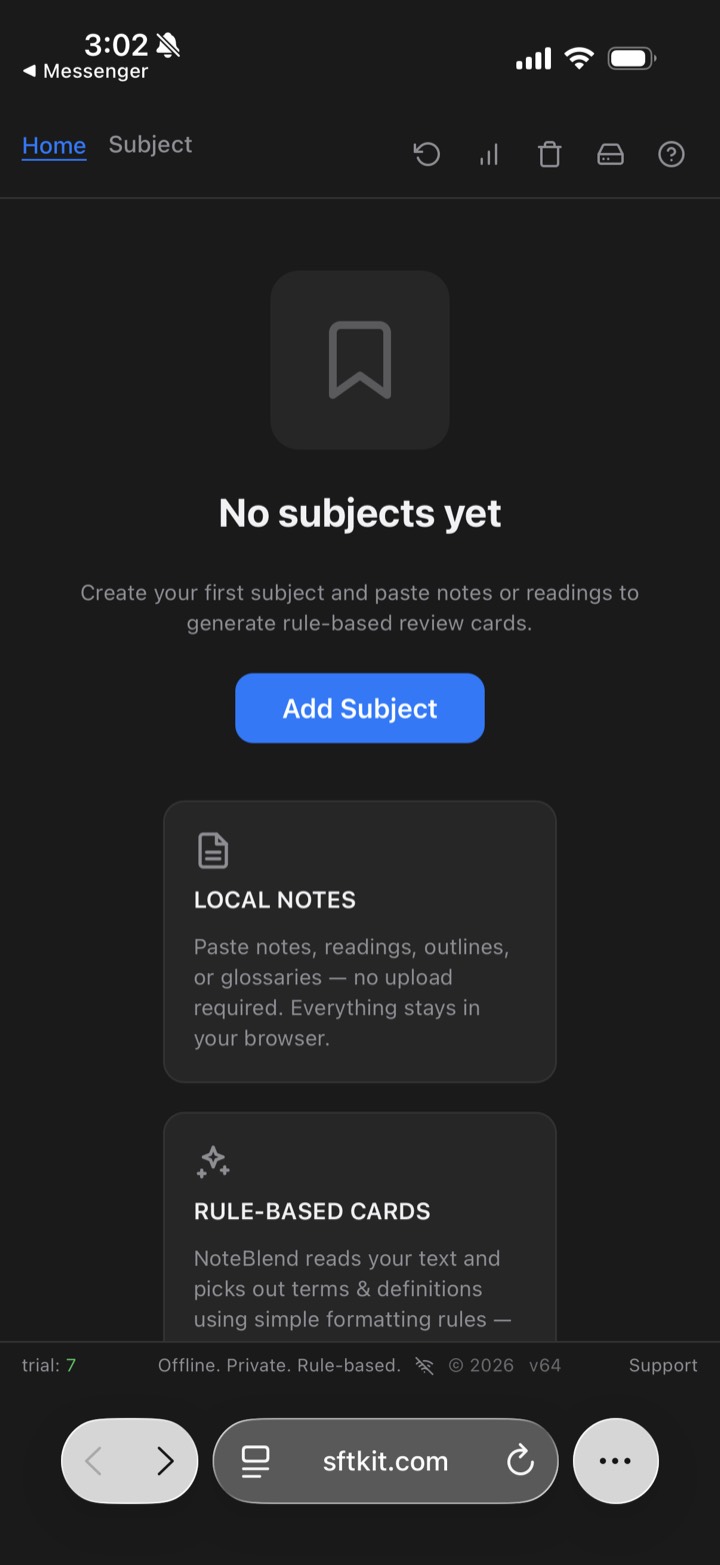
3. Follow the install steps above.
Install on iPhone / iPad (Safari)
iOS and Android follow the same principle: open NoteBlend in your browser, then add it to your home screen. Once added, it opens full screen with its own icon and works online or offline.
-
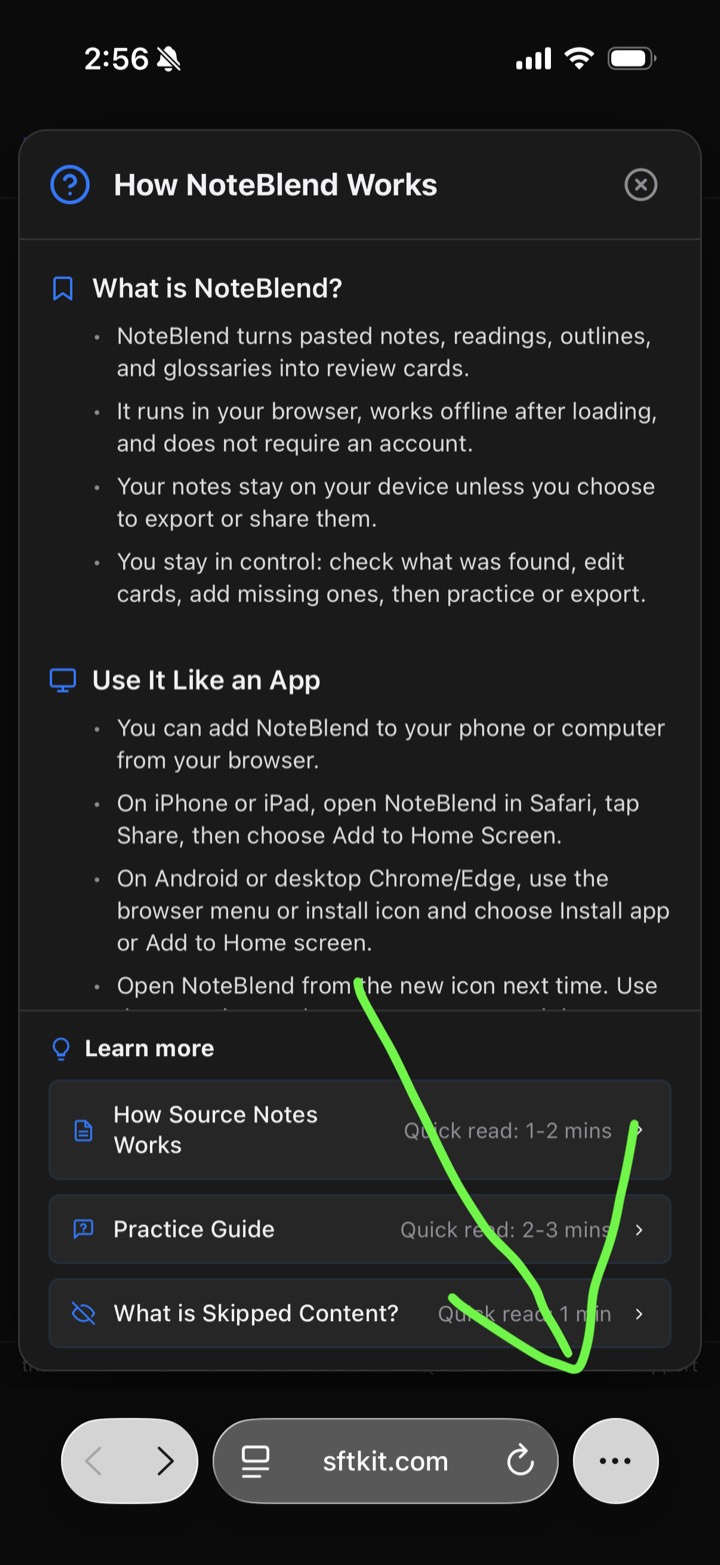
1. Tap the three-dot icon at the bottom-right corner.
-
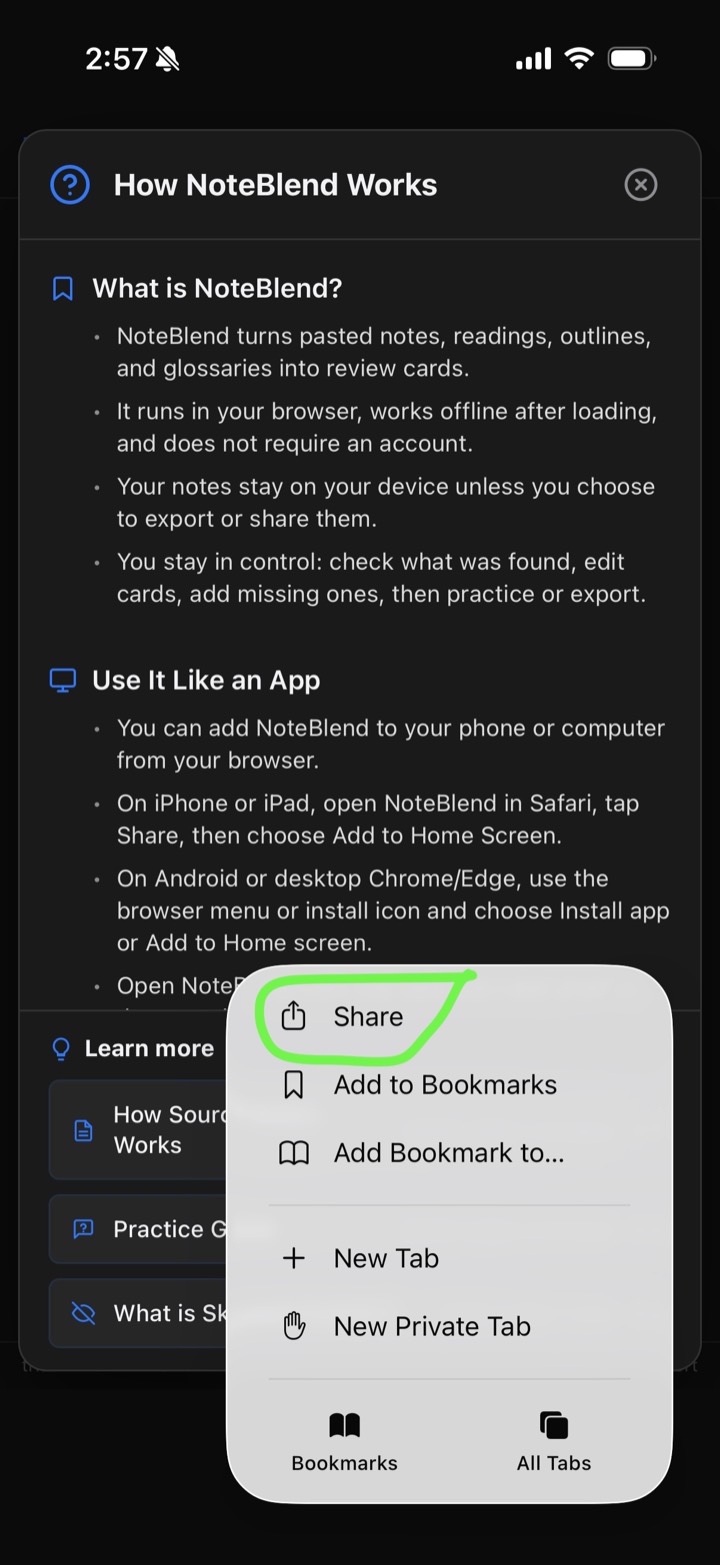
2. Tap "Share".
-
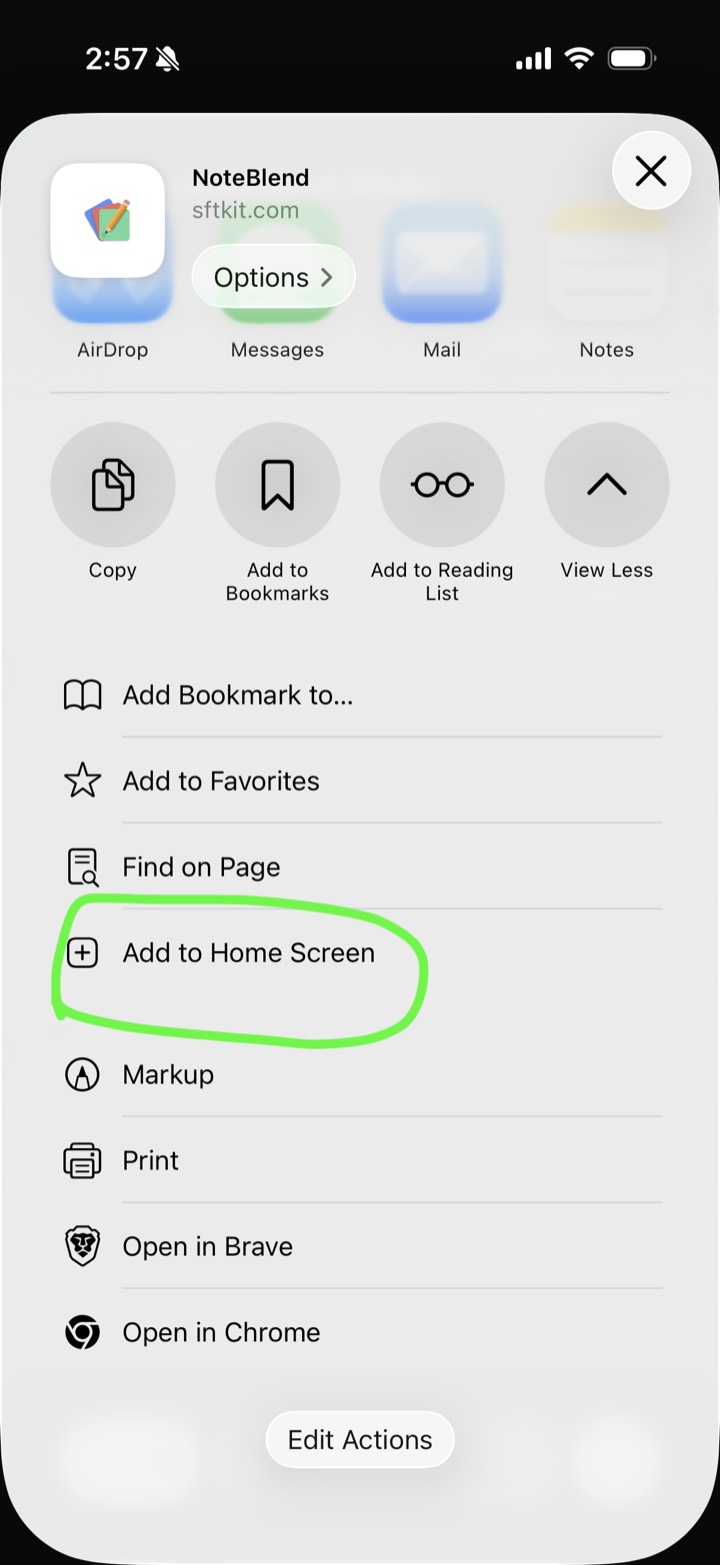
3. Tap "Add to Home Screen".
-
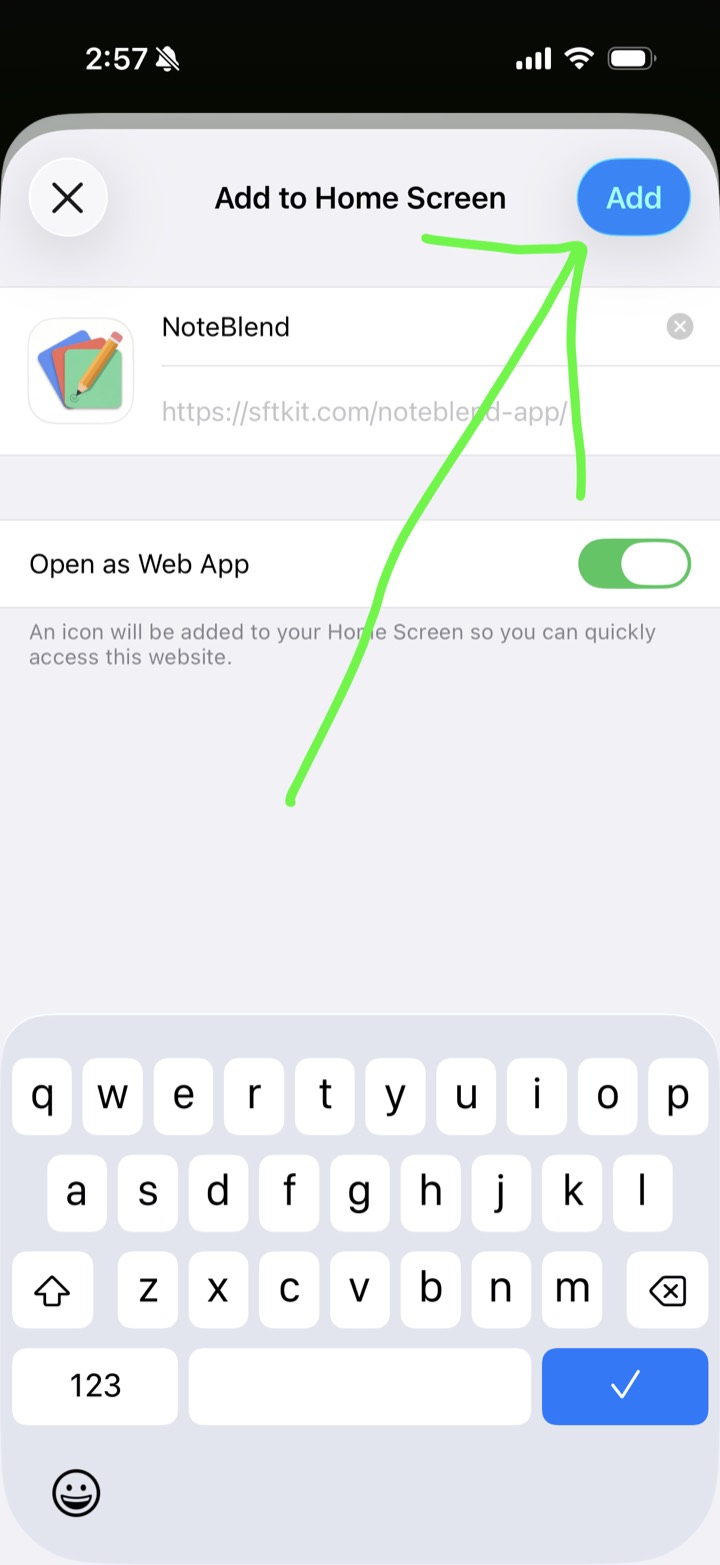
4. Tap the "Add" button.
-
5. Done. Open NoteBlend from your home screen — it works online or offline.
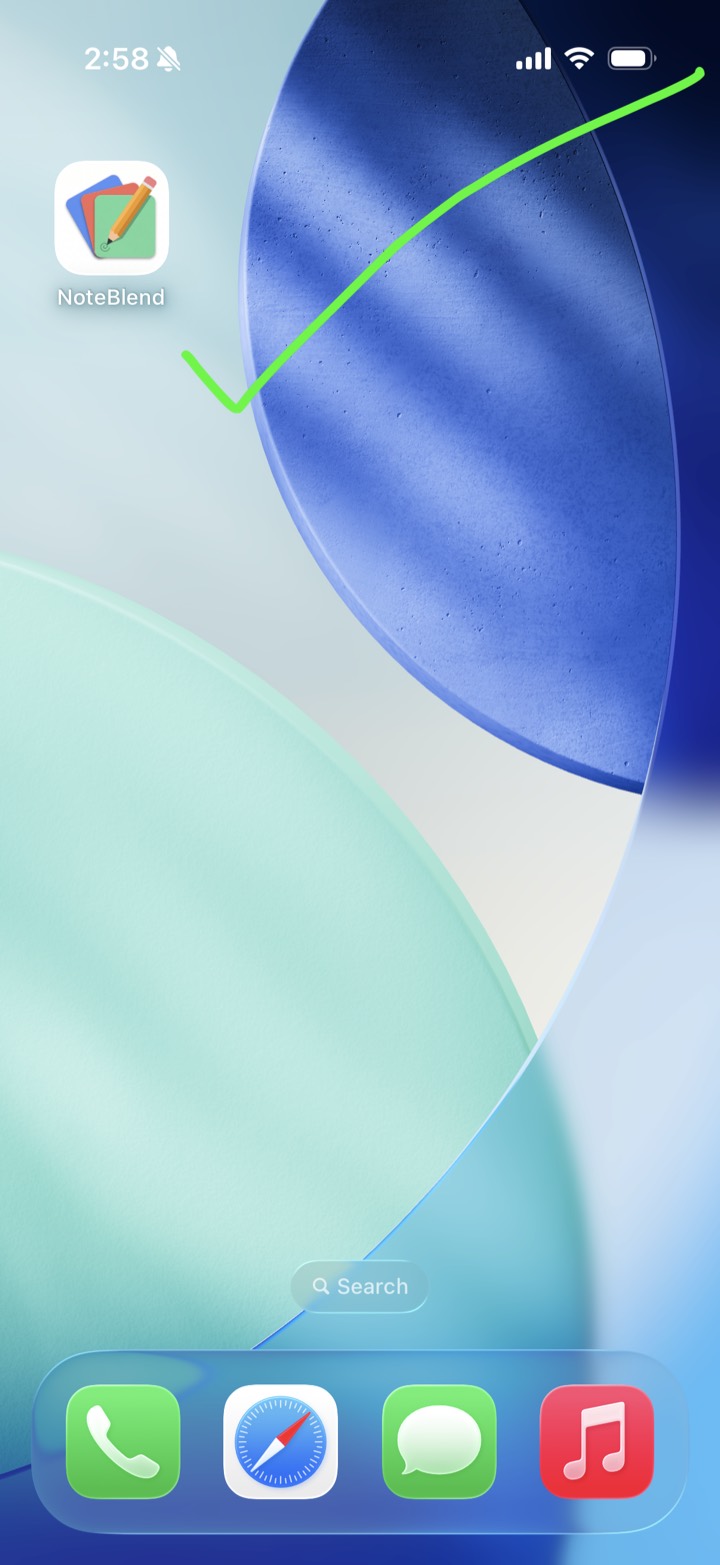
Using a different browser (Chrome, Edge, Firefox)? Tap Share and look for "Add to Home Screen" — the steps are the same.
Opened the link from Messenger?
Messenger opens links in its own built-in browser. Move to a real browser first, then install as usual. This applies to both iOS and Android:
-
1. Tap the Share icon and choose "Open in Browser".
-
2. Choose Safari, or any browser you prefer.
-
3. Follow the install steps above.
How to back up & restore your files
Back up your data
-
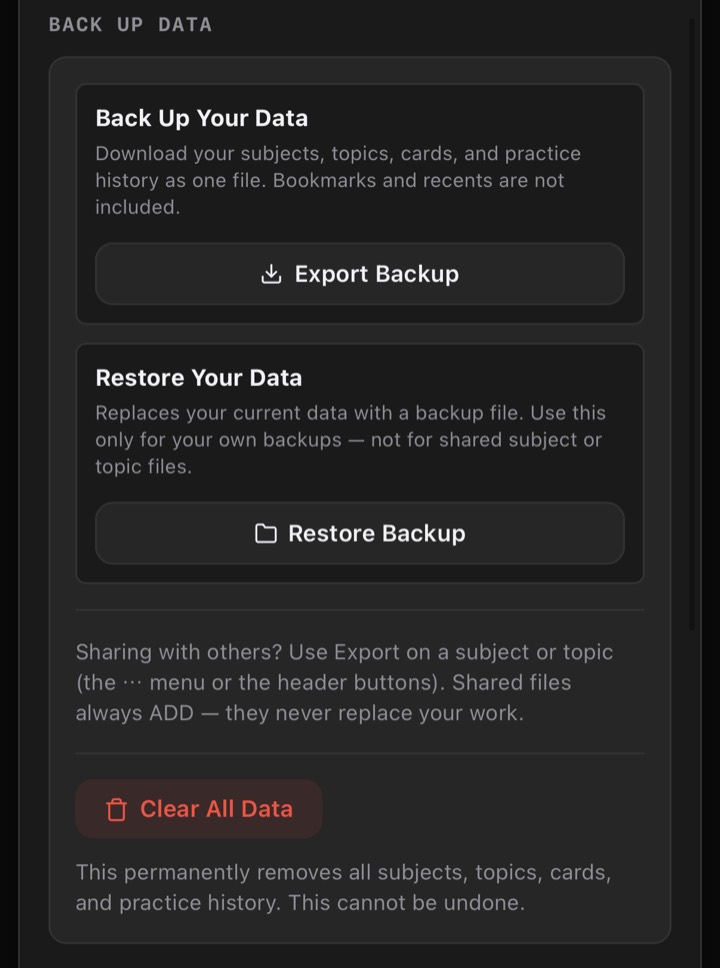
1. Tap the data storage icon at the upper-right corner.
-
2. Under "Back Up Your Data", tap "Export Backup". Your entire library is saved as a single file.
Restore your data
- Under "Restore Your Data", tap "Restore Backup" and choose your backup file. Your data will be loaded.
Note: restoring replaces all of your existing data with the contents of the backup file. A confirmation message will appear before anything is replaced — proceed carefully.
File sharing
Sharing files with someone is as easy as sending an email or a chat message.
Good to know: backing up your data (Export Backup) is always free. Restoring, importing, and sharing files work during the free trial and with any key — see the How to Unlock tab.
Sharing a Subject file
On Home (Subjects) page:
-
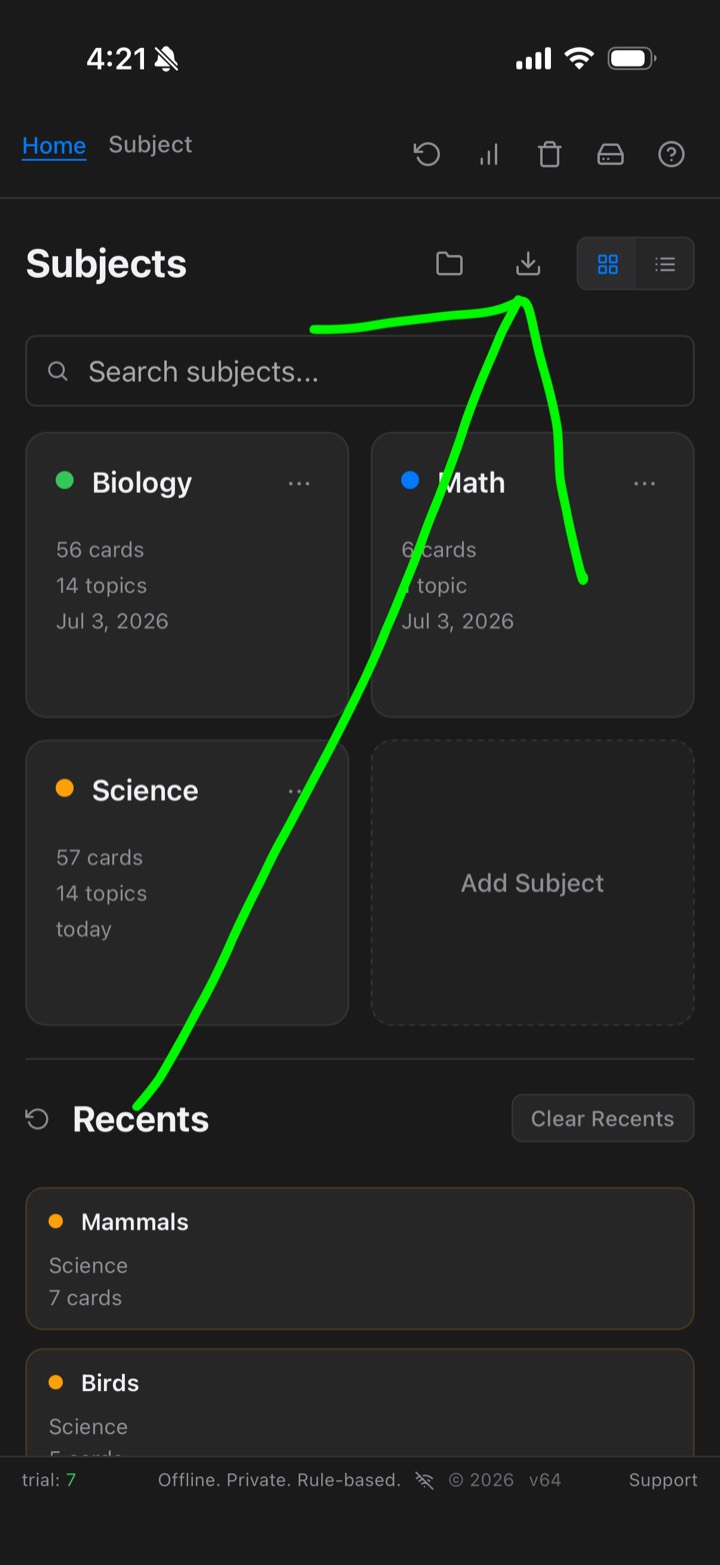
1. Tap the arrow-down icon at the top.
-
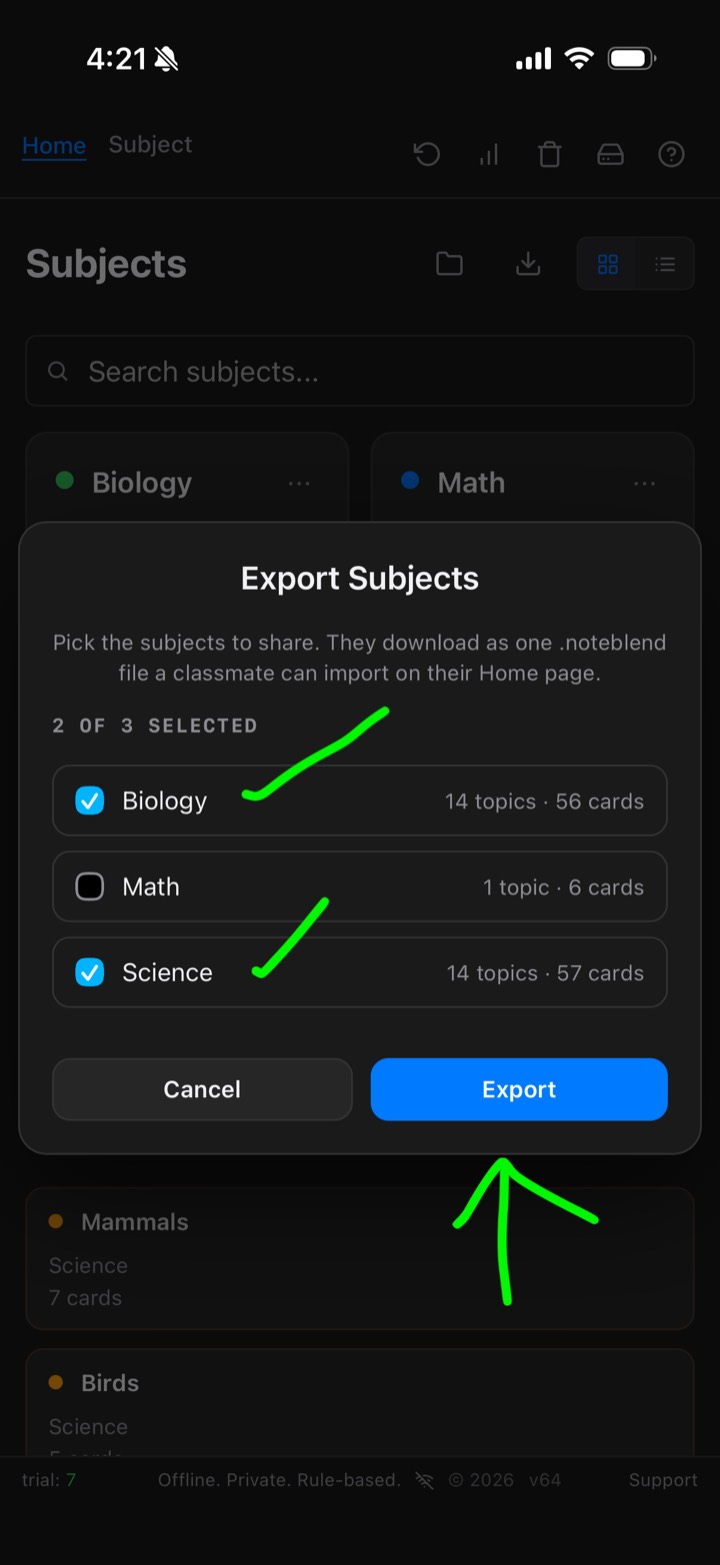
2. In the "Export Subjects" popup, tick the subjects you want to share, then tap Export and send the file through Messenger, email, or any app.
Note: only subject files can be imported on this page — topic and backup files will not work here.
Sharing a Topic file
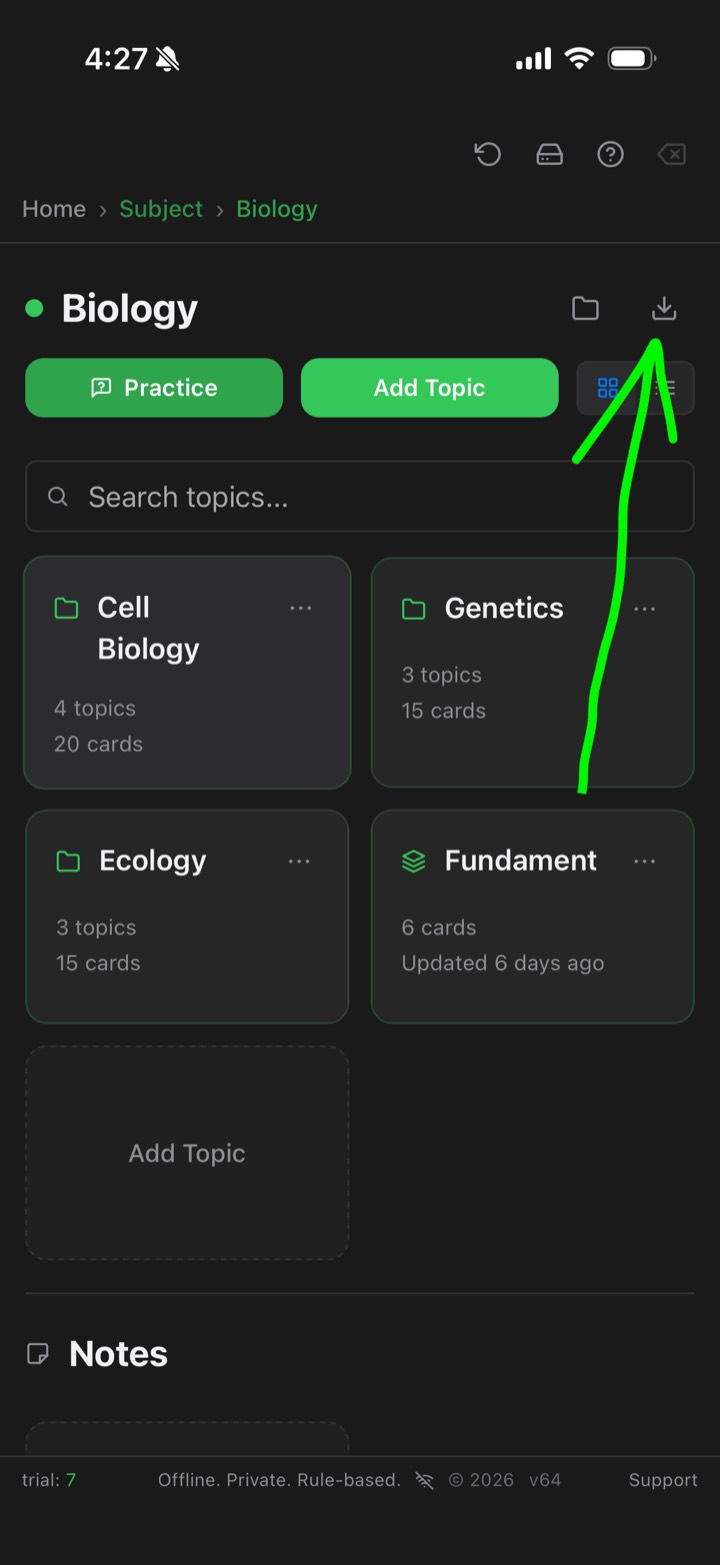
On Home → Subject (Topics) page:
-
1. Tap the arrow-down icon at the top.
-
2. In the "Export Topics" popup, tick the topics you want to share, then tap Export and send the file.
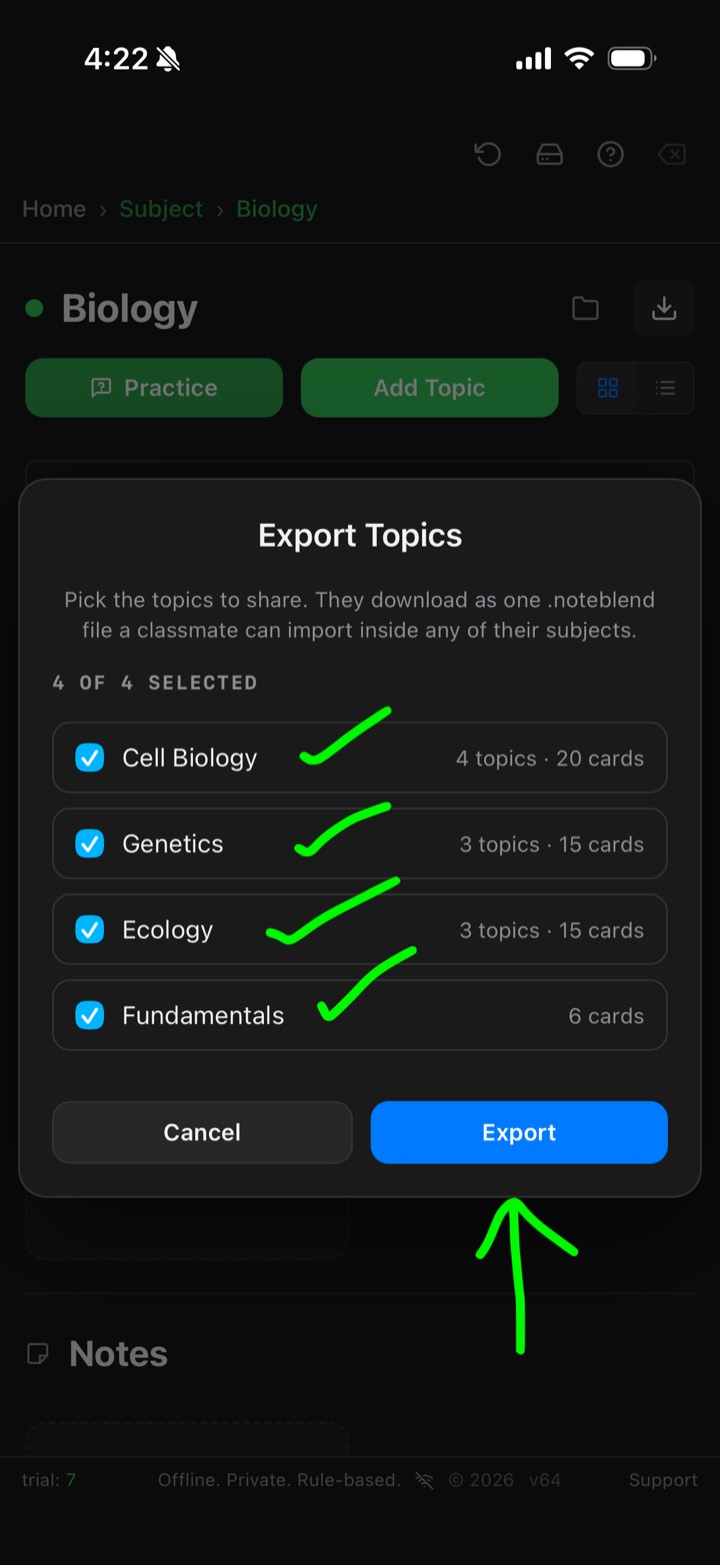
Note: only topic files can be imported on this page — subject and backup files will not work here.
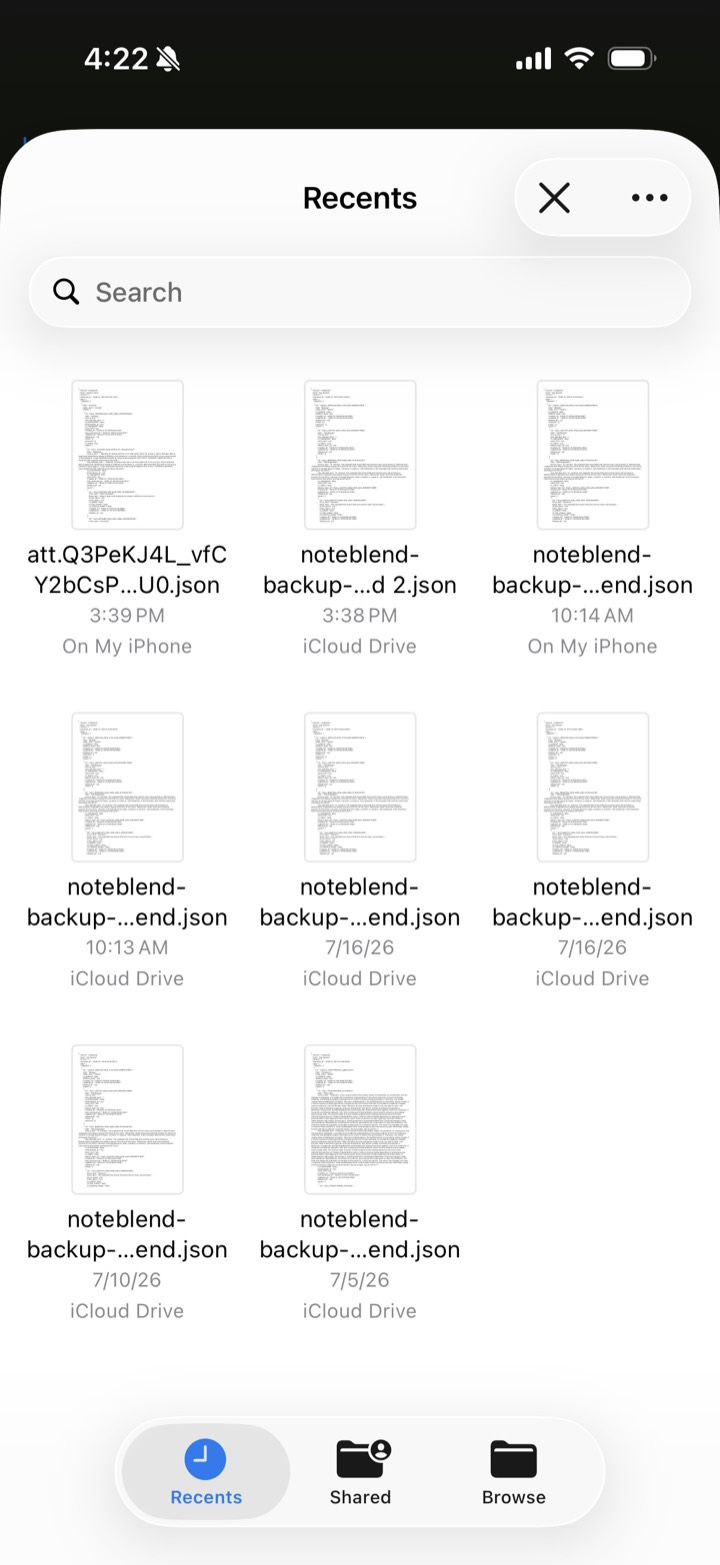
Opening a file you received
-
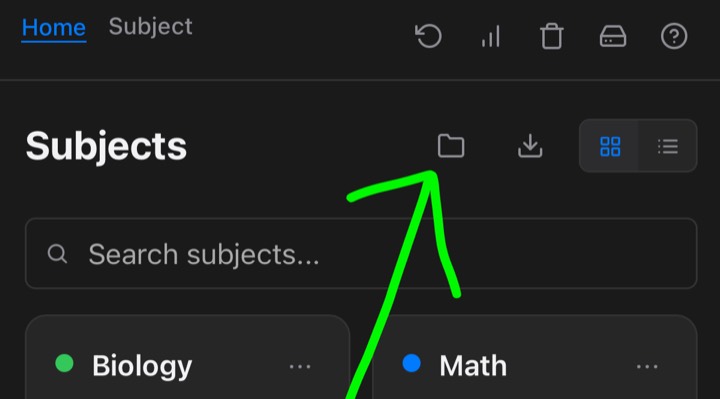
1. Save the file to your device, then open the matching page. For a subject file, go to the Home page and tap the folder icon at the top.
-
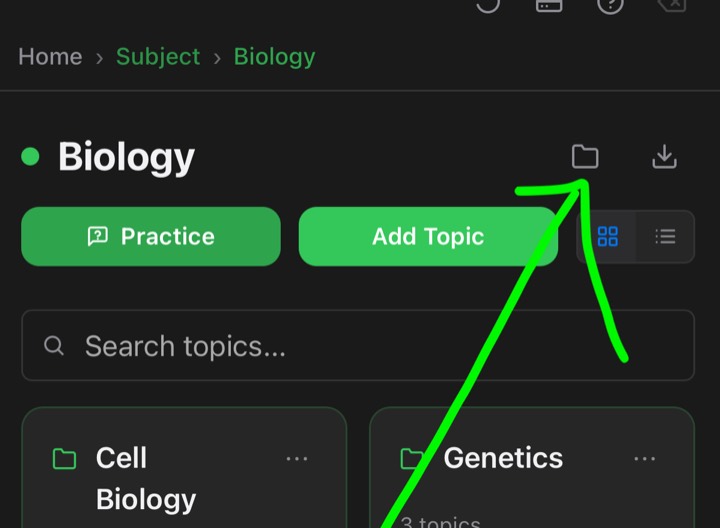
2. For a topic file, open a subject and tap the folder icon at the top of its topics page.
-
3. Your file picker opens. Choose the NoteBlend file you received, and its content is added to your library. Imports always add — they never replace your existing data.
How the free trial and unlock work
NoteBlend starts with a 7-day free trial of everything — no account needed. Create subjects, paste notes, blend cards, practice in every mode, and print exam packs.
After the trial, a one-time key keeps the full app unlocked. Your library always stays on your device — viewing, practicing, and backing up your data are free forever. No subscription, no account.
Two keys to choose from
Standard
₱399
Early-user price · regularly ₱499
- Create and edit subjects, topics, notes, and cards
- Import and share reviewer files
- Restore backups
- Works offline, forever
Full Access
₱1,299
Early-user price · regularly ₱1,499
- Everything in Standard
- Printable exam packs: Multiple Choice, Identification, True or False, Match Column, Enumeration, Classification
- Set A/B class sets, answer keys, and bubble sheets
One-time payment per device — no subscription, no account, no renewals.
Upgrading later? Start with Standard and move up to Full Access anytime — you pay only the difference, never the full price again. Send the same device code, paste the new key, and it replaces the old one. Your library stays exactly as it is.
Good to know before you buy
Keys are per device. A key unlocks the one device it was made for and cannot be moved to another phone or computer later. Changing phones or clearing your browser data creates a new device code — message Support and we will reissue your key free.
Printing exams. For the cleanest papers, build and print exams on a computer. Phone browsers add the page address and date to anything they print and give no way to switch it off, so a PDF saved on a phone keeps those marks wherever you print it. The Word file download has no such marks on any device — and it opens in Microsoft Word, so you can edit the paper before printing.
How to unlock
- Add NoteBlend to your home screen (see the Android or iOS tab), then open it from the home-screen icon.
- Tap any button marked 🔒 — the unlock popup appears.
- Copy your device code shown in the popup — it looks like KQ4M-8XWZ.
- Send the device code to Support together with your payment.
- You will receive your serial key — one long line starting with NB. Paste the whole line into the popup and tap Unlock.
Once unlocked, it works offline — no internet needed again. Started with a Standard key and want printable exams later? Send your device code to Support again to upgrade to a Full Access key.
Note: each key is made for one device and only works with its device code — sharing it with someone else will not unlock their device. Got a new phone, or cleared your browser data? Contact Support with your new device code and we will replace your key for free.
How NoteBlend works
NoteBlend follows one short flow: create a subject, add a topic, paste your notes, and practice — or print. No account, no setup. The walkthrough below covers the entire process, from first launch to printable exams. It fits students, teachers, board-exam reviewees, and anyone studying structured material.
Set up a subject and topic
-
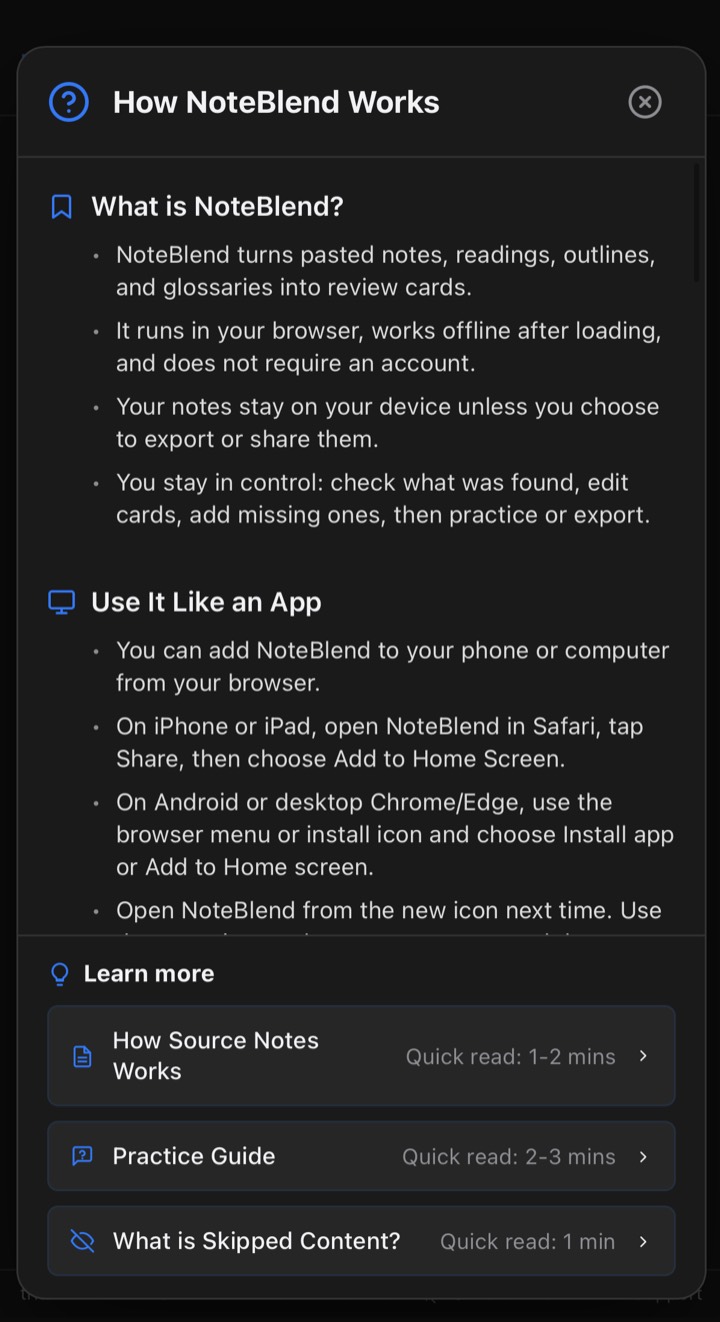
1. On first launch, read the short on-screen guide — it explains how the app works. You can reopen it anytime from the "?" icon at the upper-right corner.
-
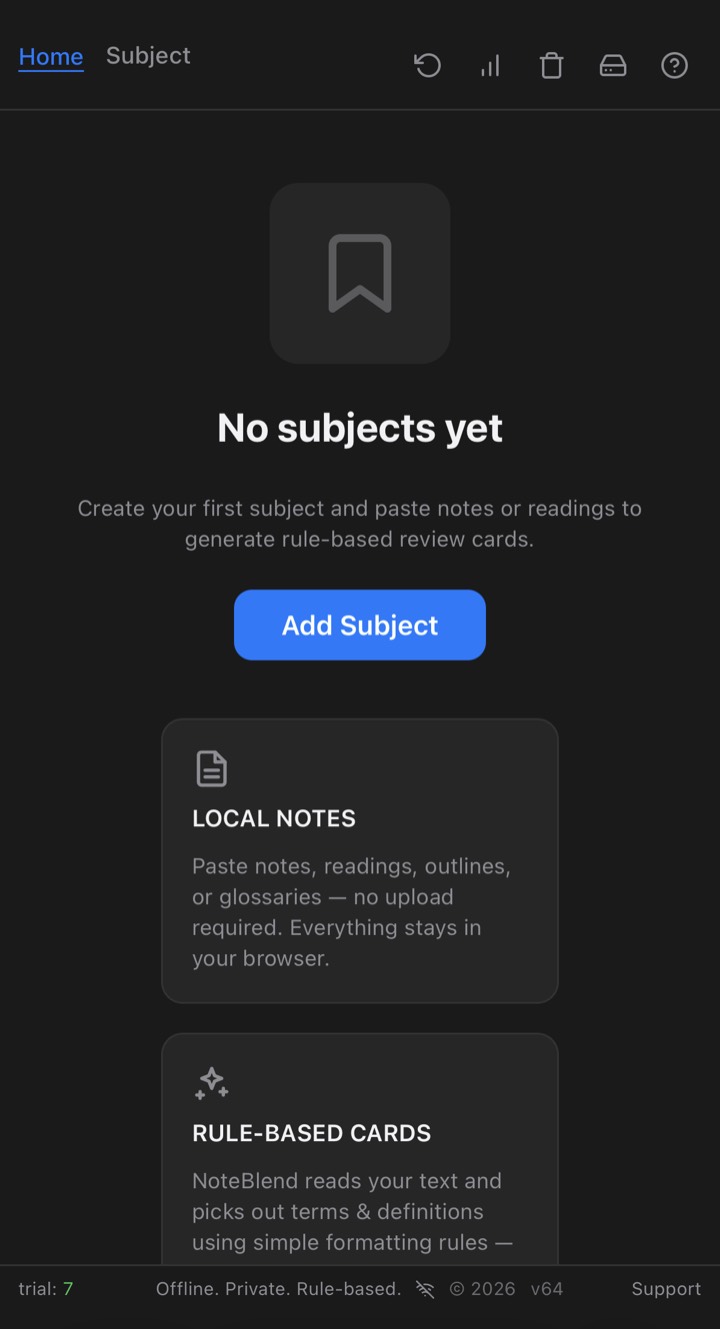
2. The library starts empty. Tap "Add Subject" to create the subject you want to study.
-
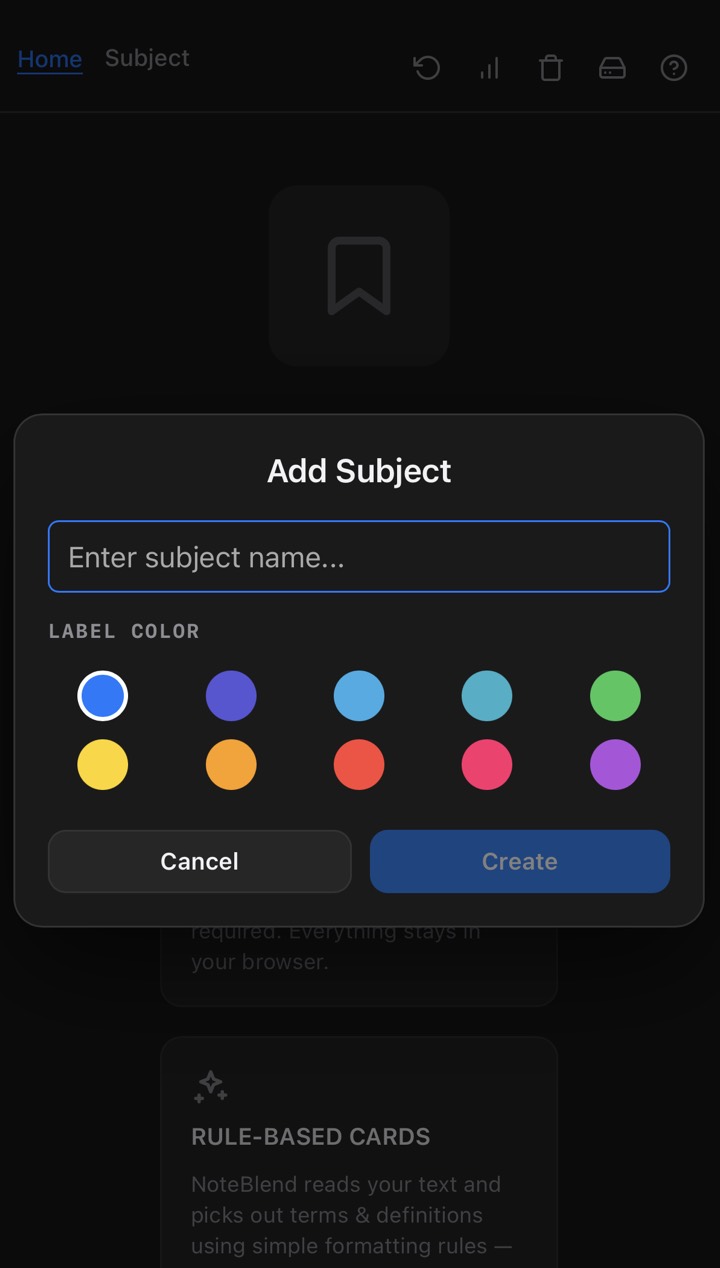
3. Type the subject name, choose a label color for it, then tap "Create".
-
4. With the subject created, open it and tap "Add Topic".
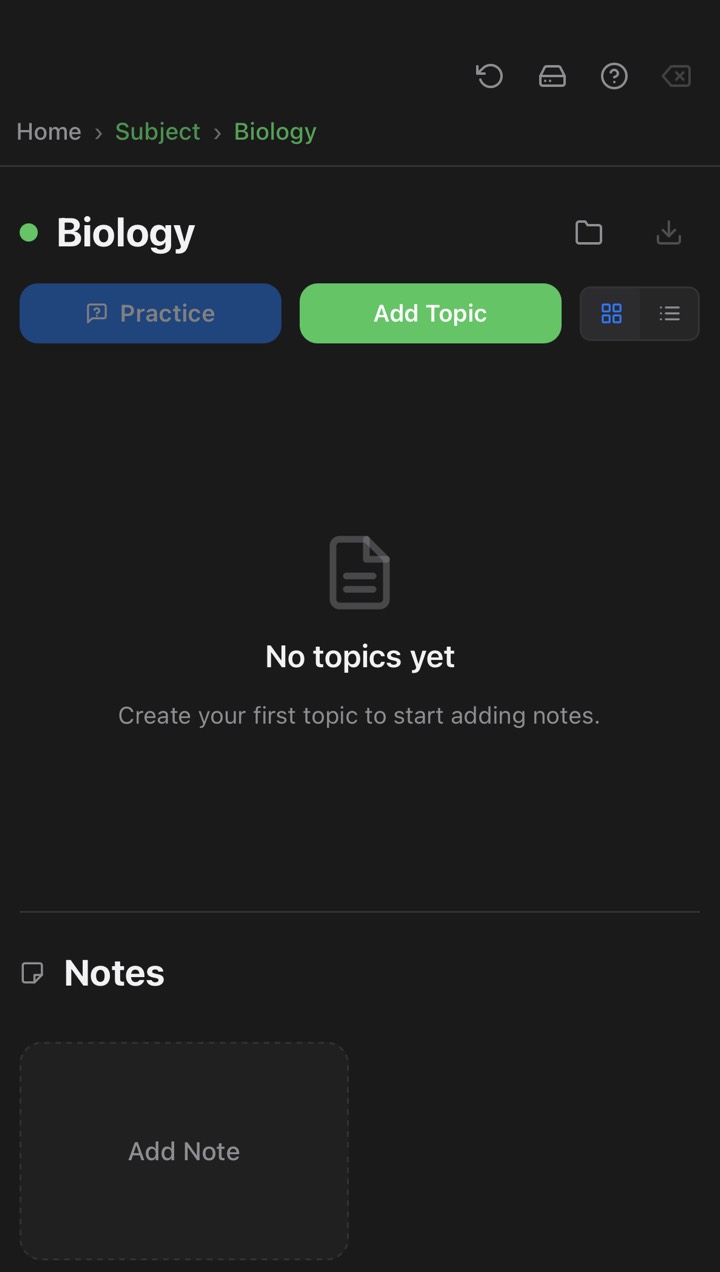
-
5. Same as with subjects: type the topic name and tap "Create".
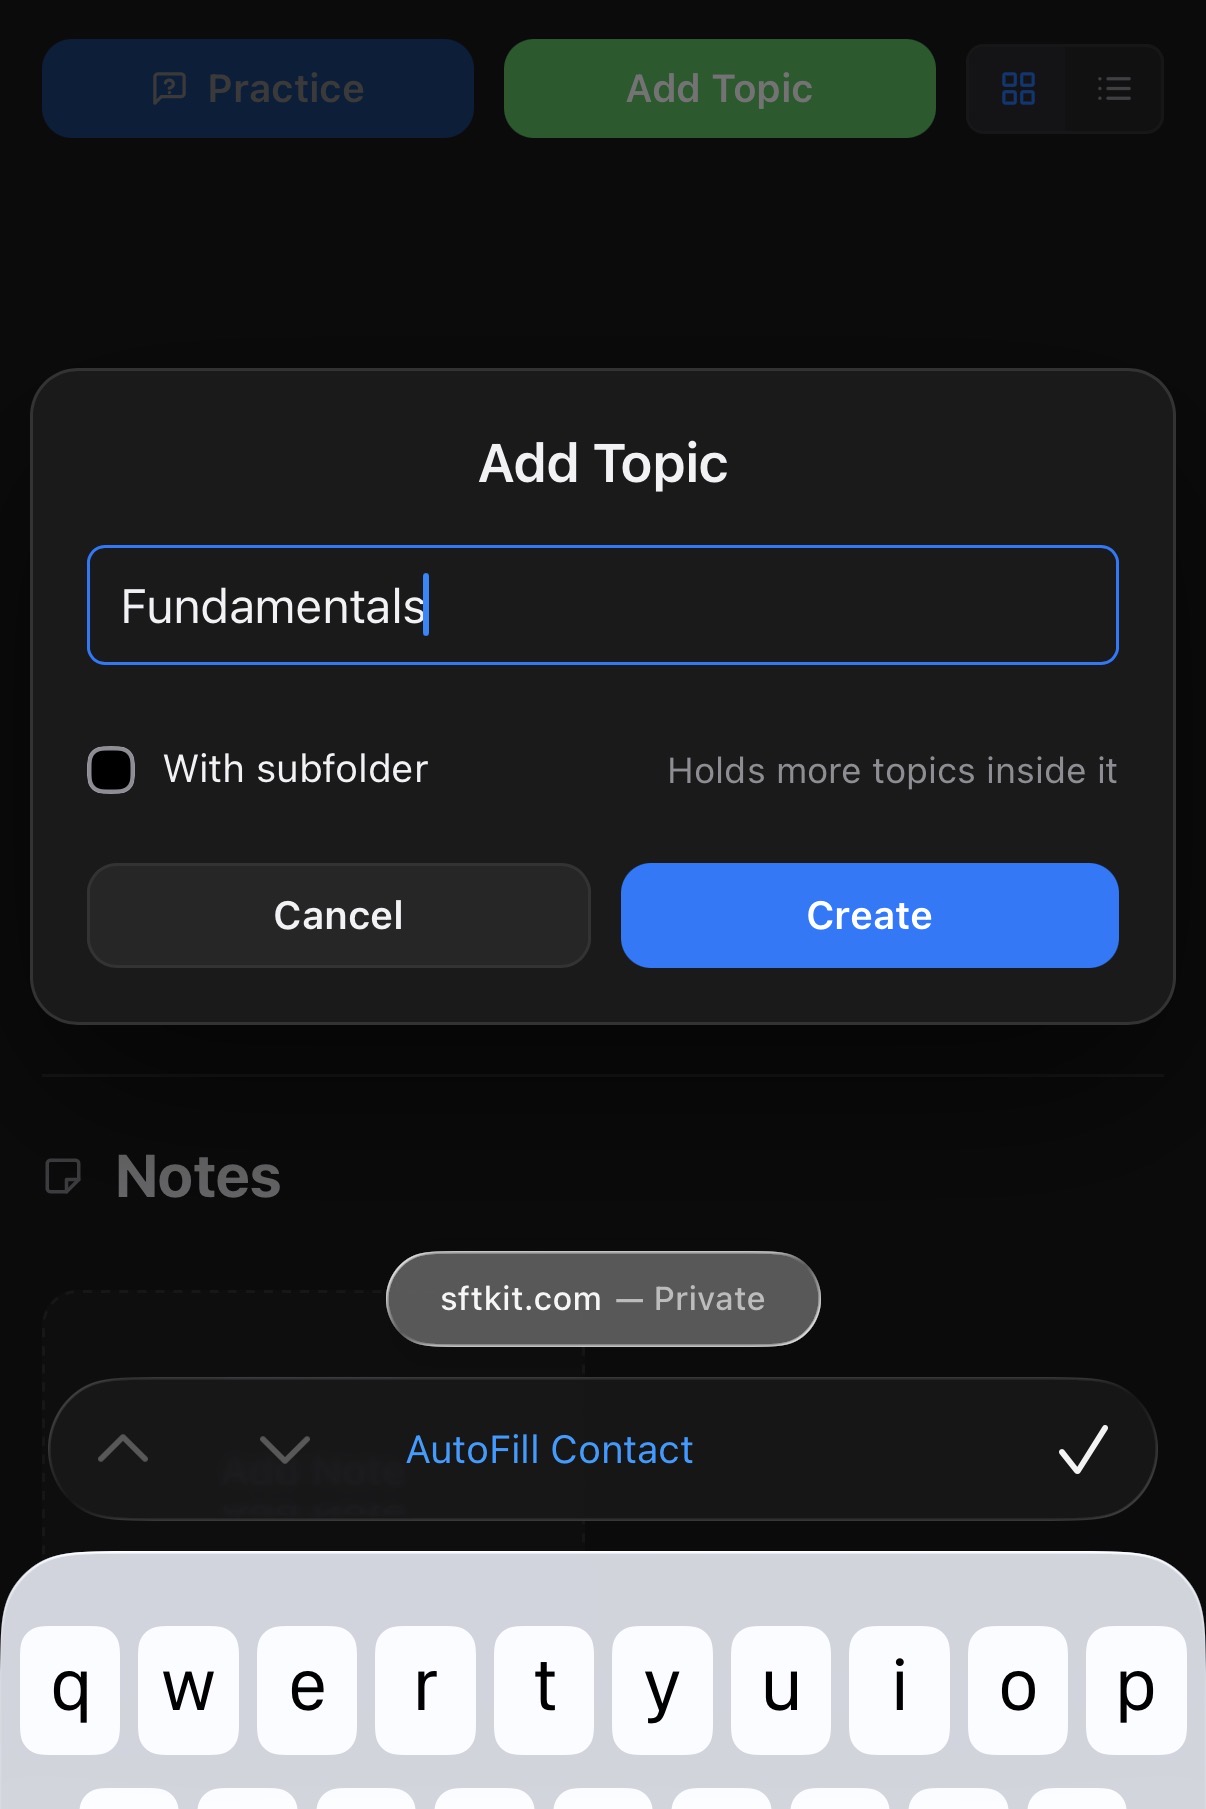
Paste notes and blend them into cards
-
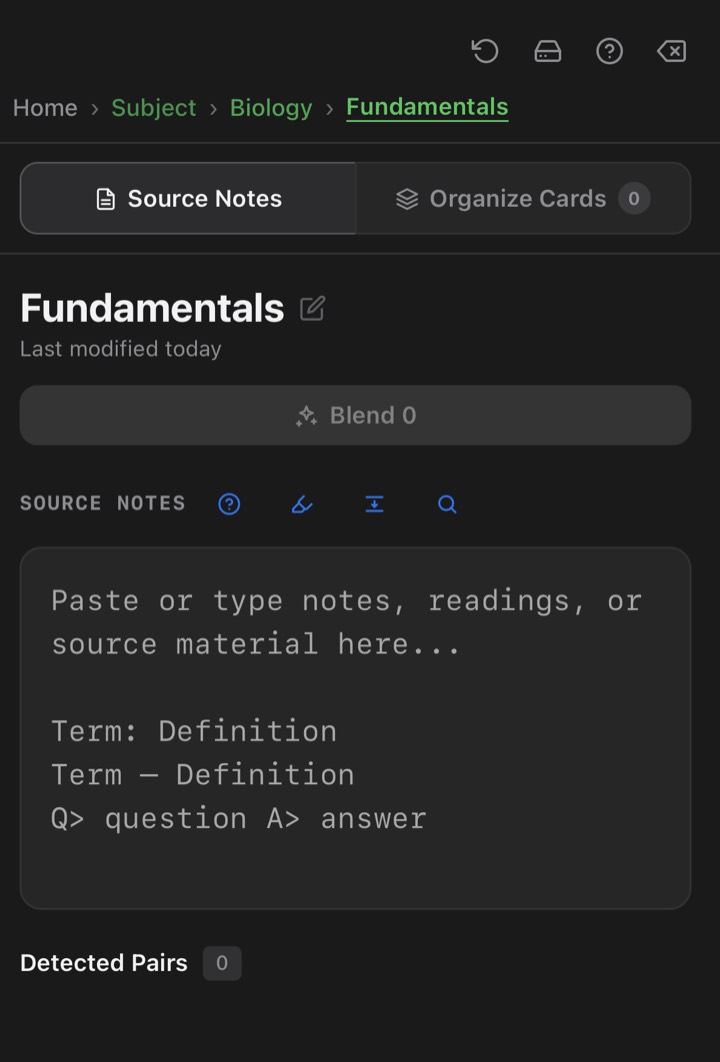
6. This is Source Notes. Any text you paste here — from reading materials, PDFs, web pages, or AI outputs — is converted into cards using rules based on common textbook patterns and formats.
-
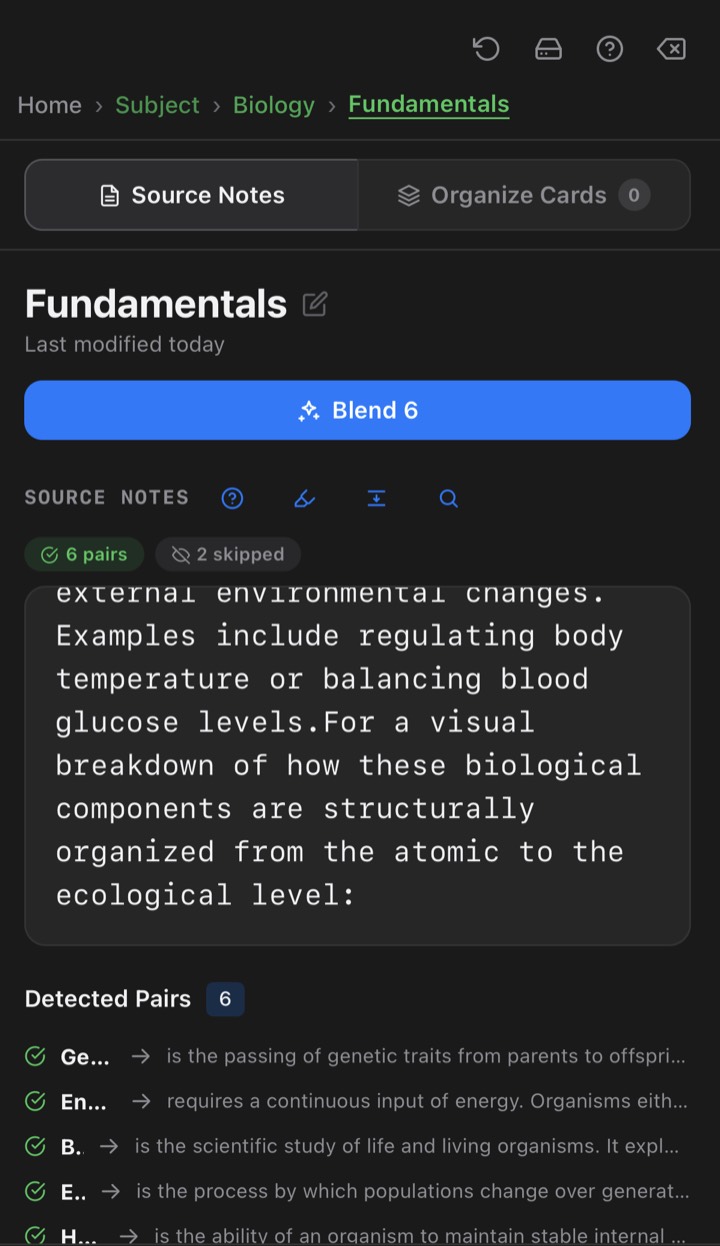
7. Paste your review material. NoteBlend detects term–definition pairs automatically — "Blend (6)" means six cards are ready to be created. If nothing is detected, tap the "?" icon to see how the text should be formatted.
-
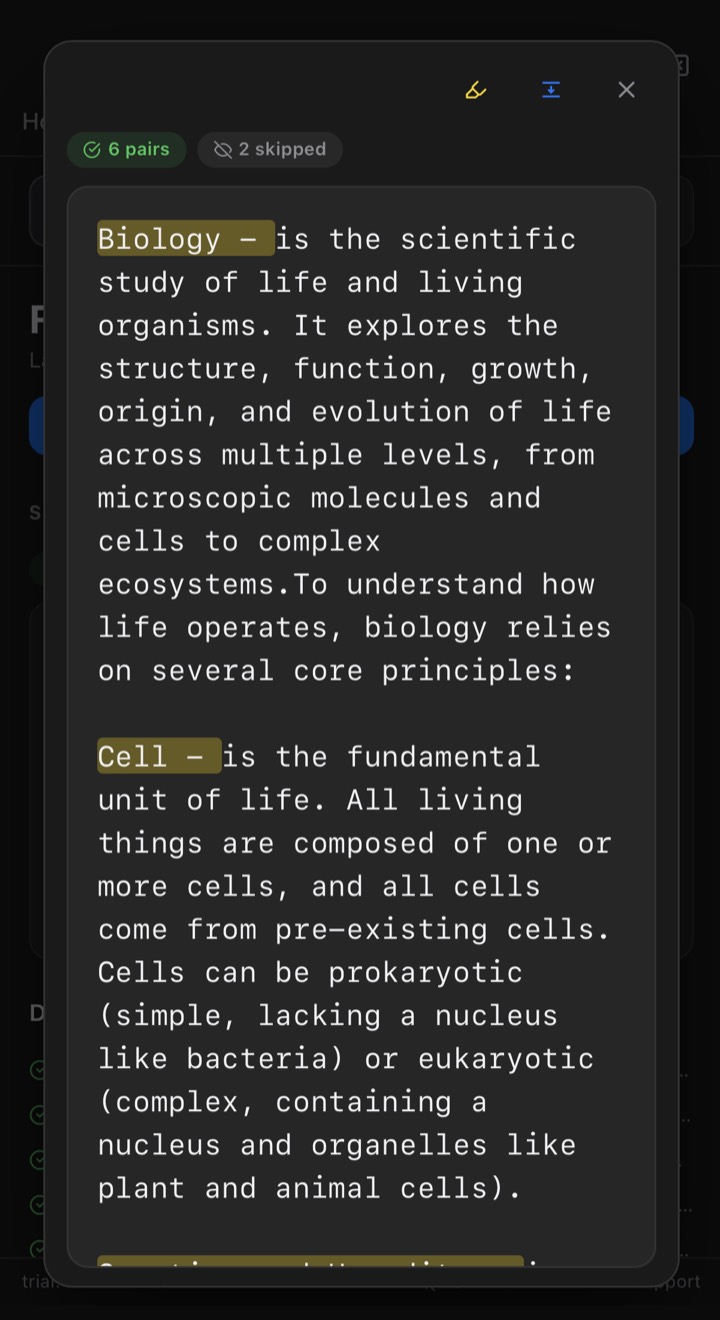
8. Tap the magnifying glass to edit your text in full screen. Optional highlights mark the detected terms so you can check them. Tip: once you are familiar with the formats, you can organize your notes before pasting for even easier detection — although Source Notes already detects pairs about 90% of the time as-is.
-
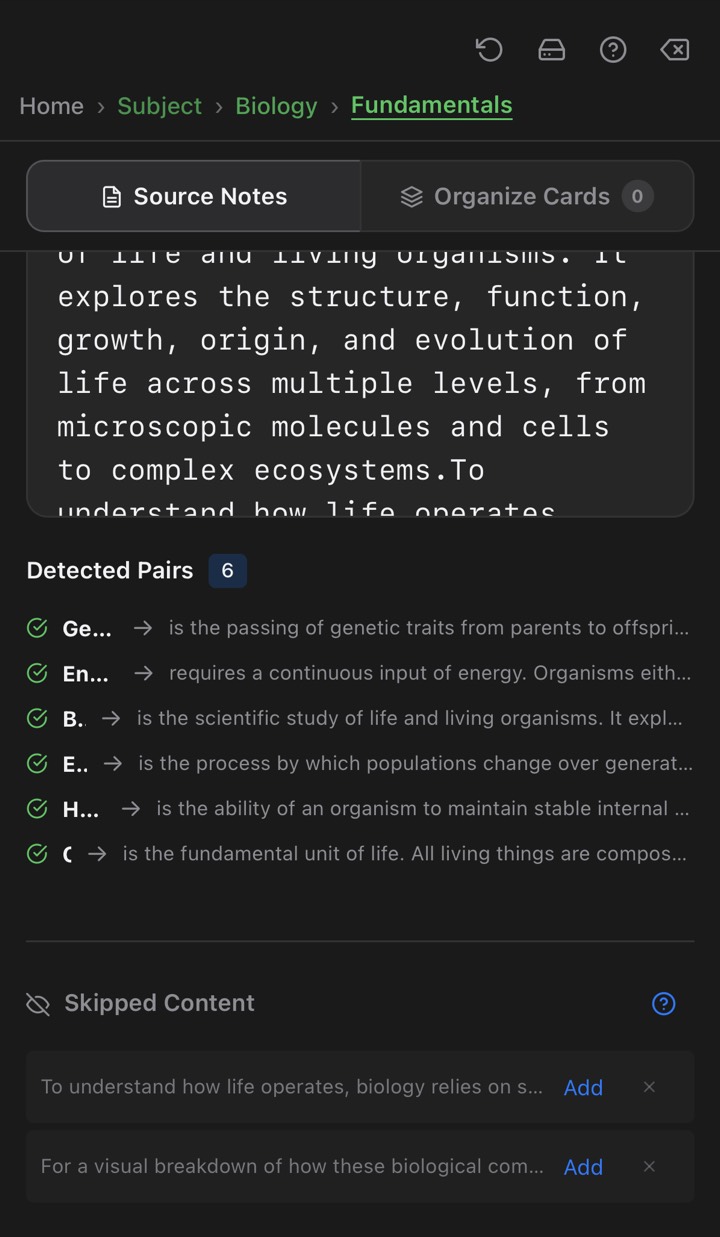
9. Below Source Notes is Skipped Content — text that was not converted, either because of its format or because it is not part of any term and definition.
-
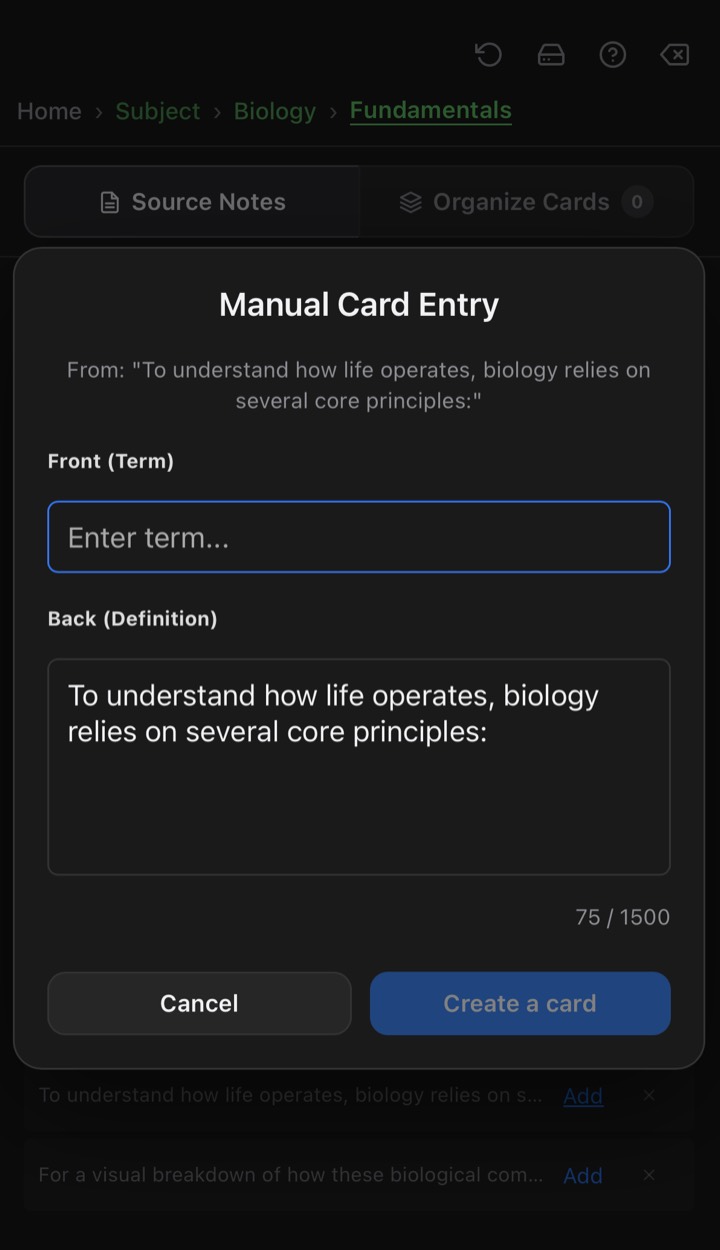
10. If a skipped item should be a card, tap "Add" and enter its front and definition manually.
-
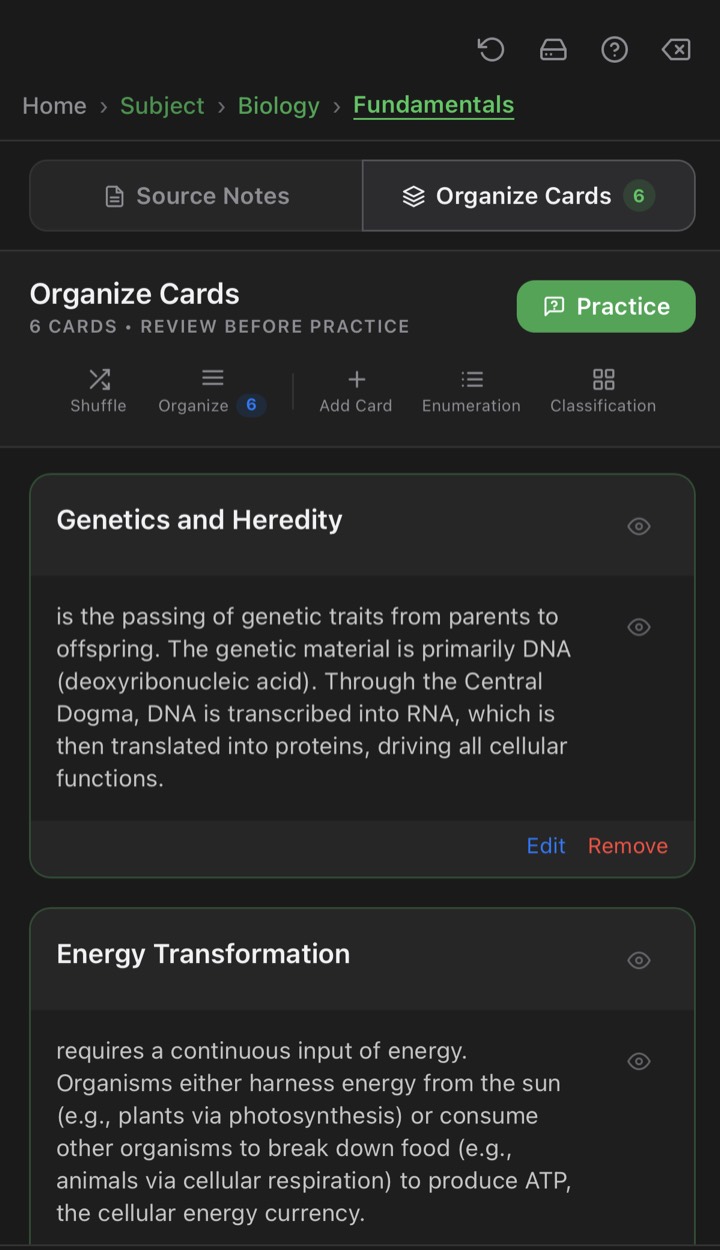
11. Tap "Blend". The Organize Cards tab lists every card — shuffle them, limit how many to practice with, or manually add enumeration and classification cards.
Practice
-
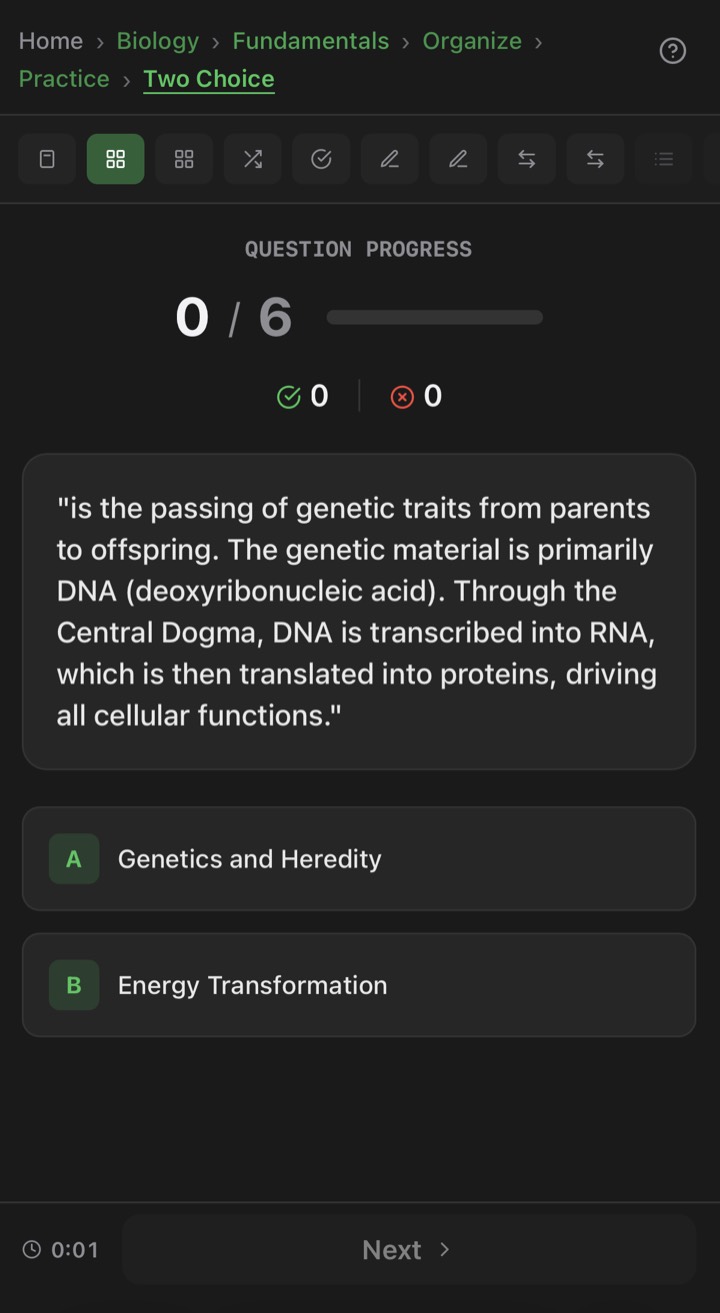
12. Tap "Practice" to choose how to study your cards. This is Two Choice — pick the correct term between two options.
-
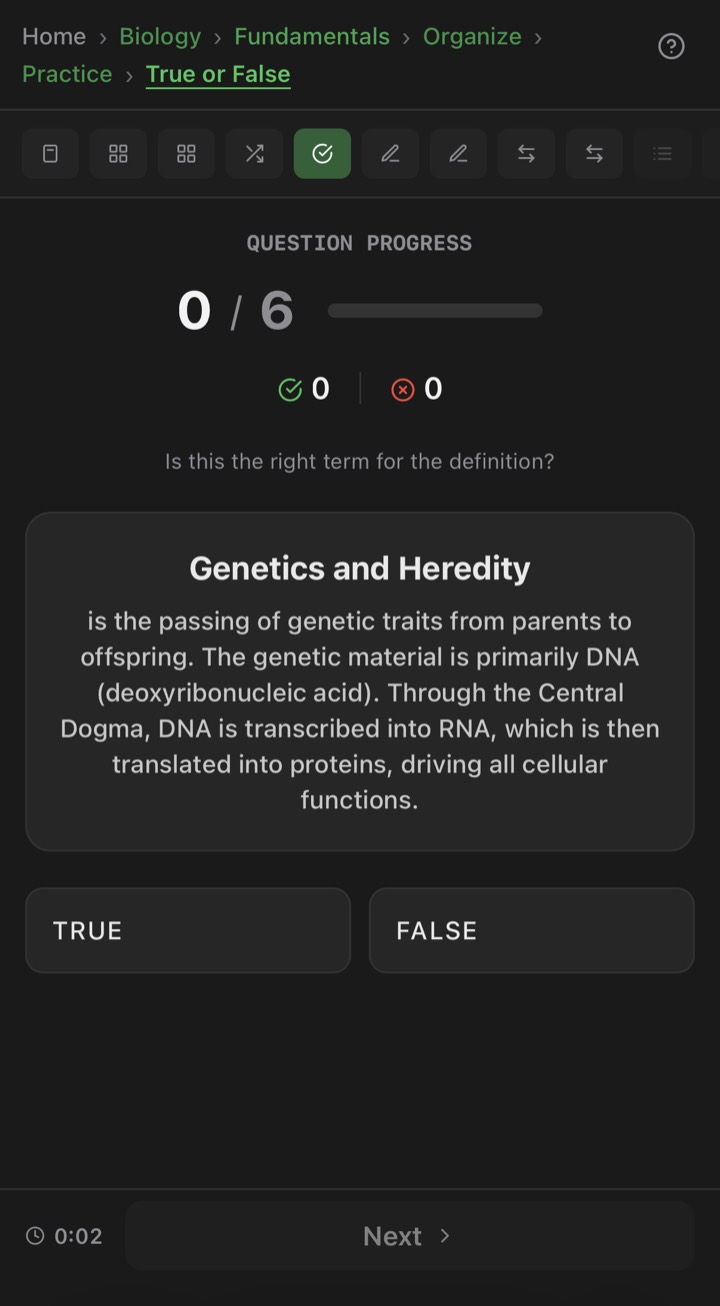
13. True or False — decide whether the term matches the definition shown.
-
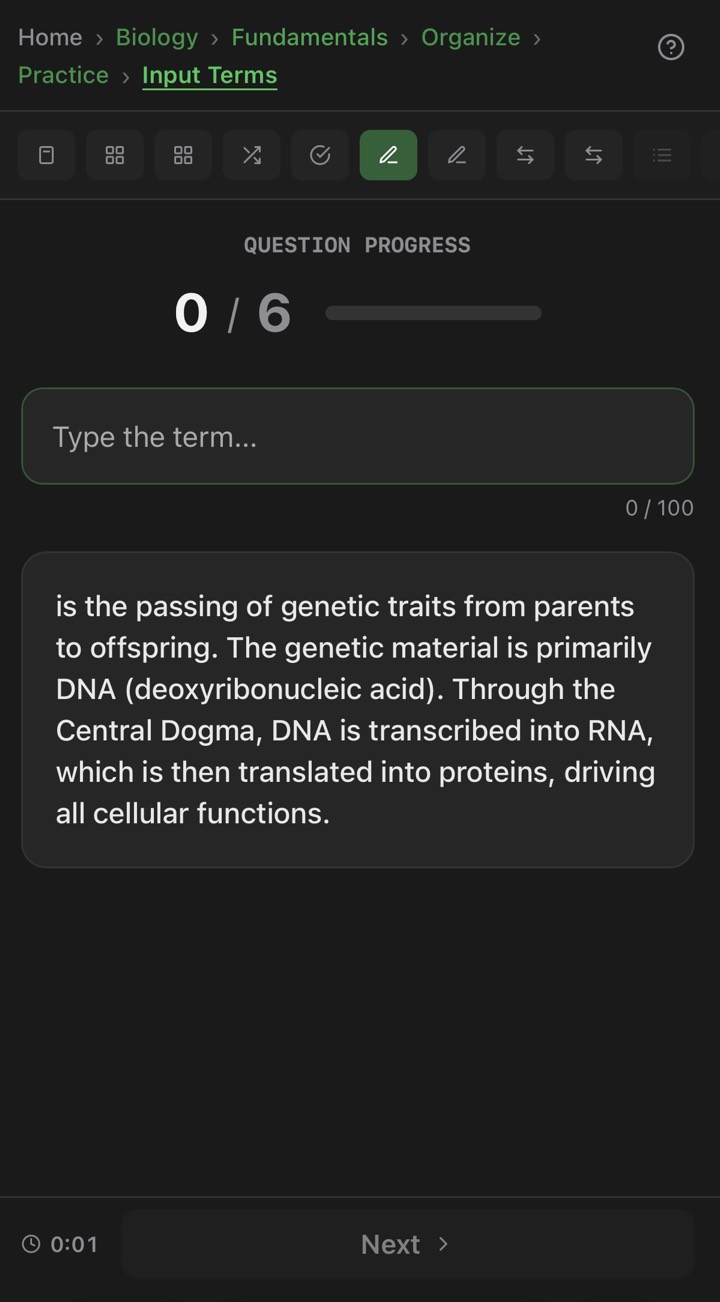
14. Input Terms — identification-style practice: type the term for the definition shown.
-
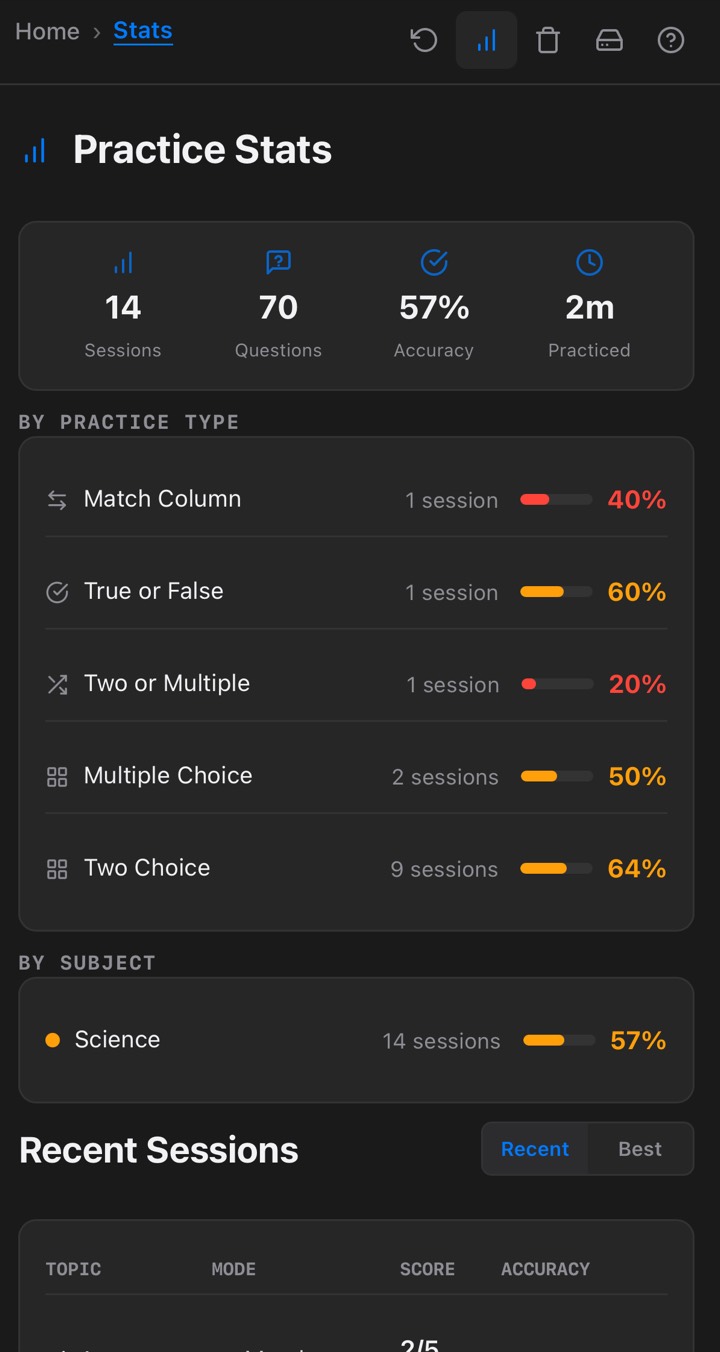
15. Your session history is saved as well — currently limited to the last 5 sessions.
-
16. Once cards are blended, you can start anytime from the Topic page — tap "Practice" and pick any mode.
Topic notes
-
17. The Topic page also holds notes — use them as reminders, or however they fit your workflow.
-
18. When adding a note, enter a title and a message. Typing "@" brings up your topics so you can link one.
-
19. Saved notes are displayed on the page as reminders of your activities.
Printing exams
Full Access turns any topic into a printable paper: Multiple Choice, Identification, True or False, Match Column, Enumeration, and Classification — with answer sheets, answer keys, and Set A/B class sets. Create a subject, add a topic, paste your review text, and the exam is ready minutes later.
Recommended: build and print exams on a laptop or computer. Desktop browsers let you switch off the page address and date, and switch on background graphics so shaded answer keys print solid black. Phone browsers offer neither, so a paper or PDF made on a phone keeps the address and date wherever you print it. Only have a phone? Download the Word file instead — it carries none of those marks on any device, and you can edit it first.
Before you print
- In the browser print window, open More settings.
- Turn off "Headers and footers" — that removes the page address, date, and page numbers.
- Turn on "Background graphics" — shaded answer keys need it to print solid.
- Print the paper, or choose "Save as PDF" to send it to someone else.
Printed on real paper
-
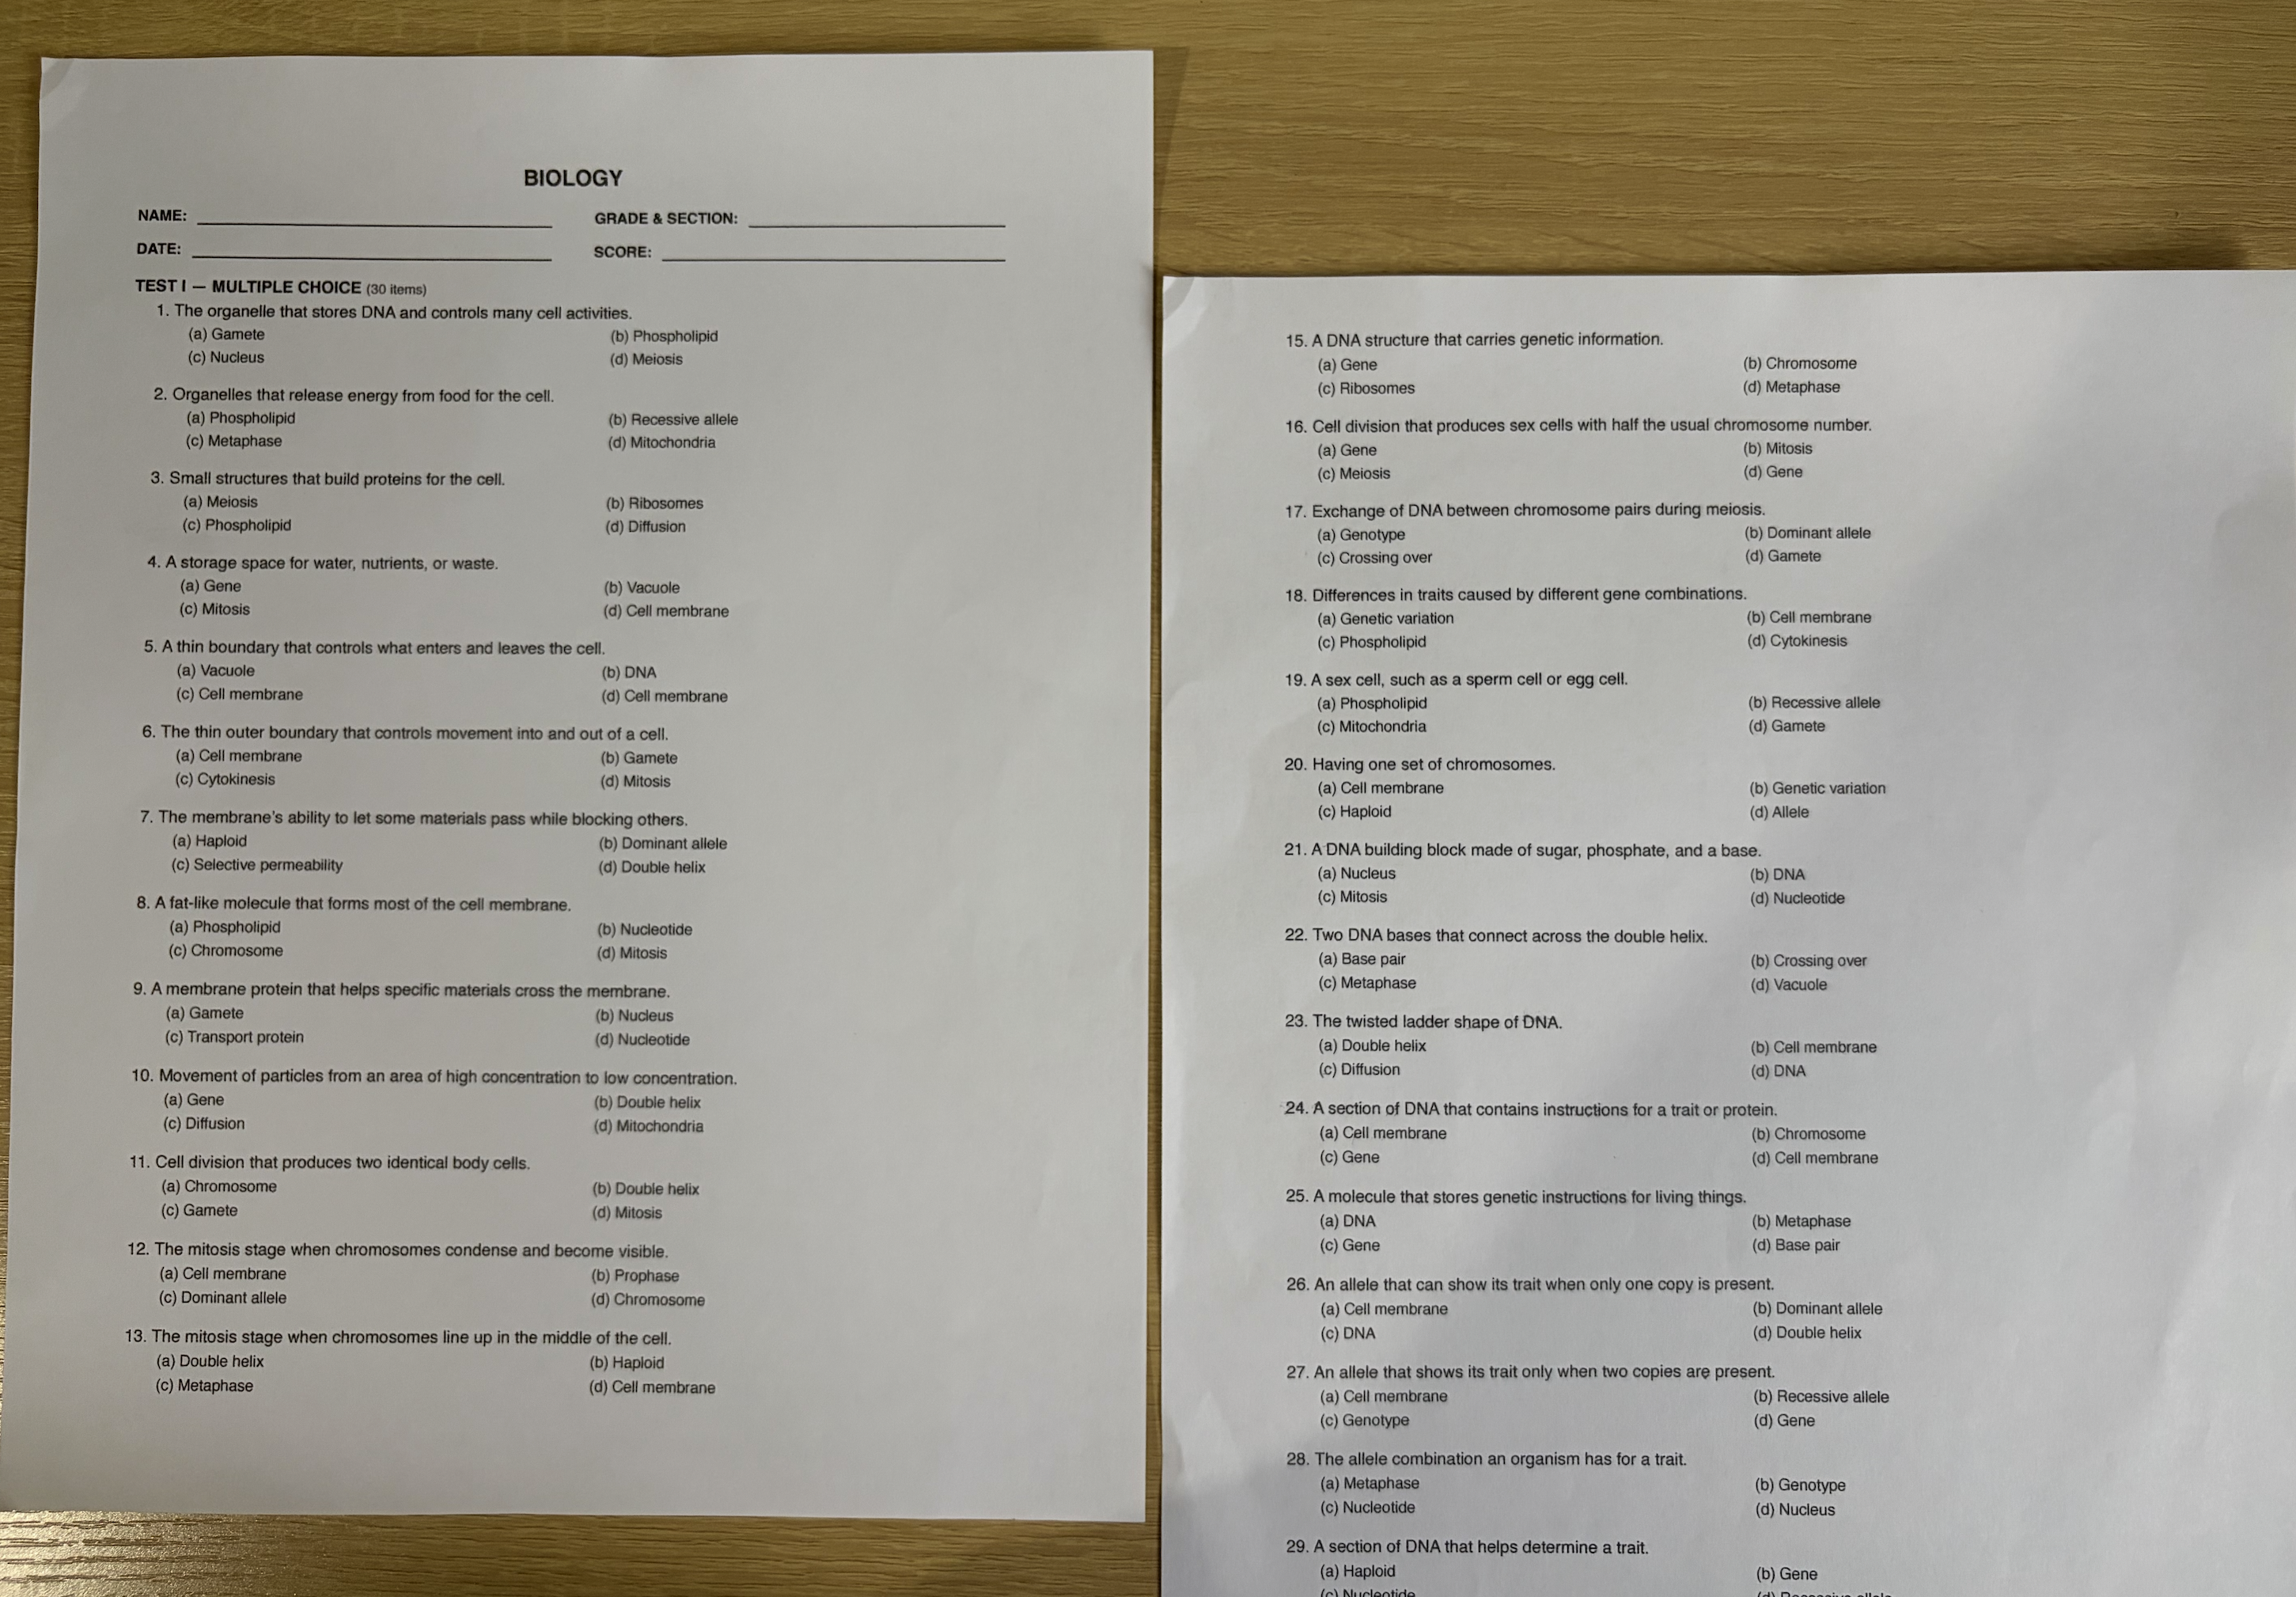
1. A Multiple Choice exam, ready to photocopy. Your own header lines sit at the top, questions are numbered per test part, and the choices print in two columns to save paper.
-
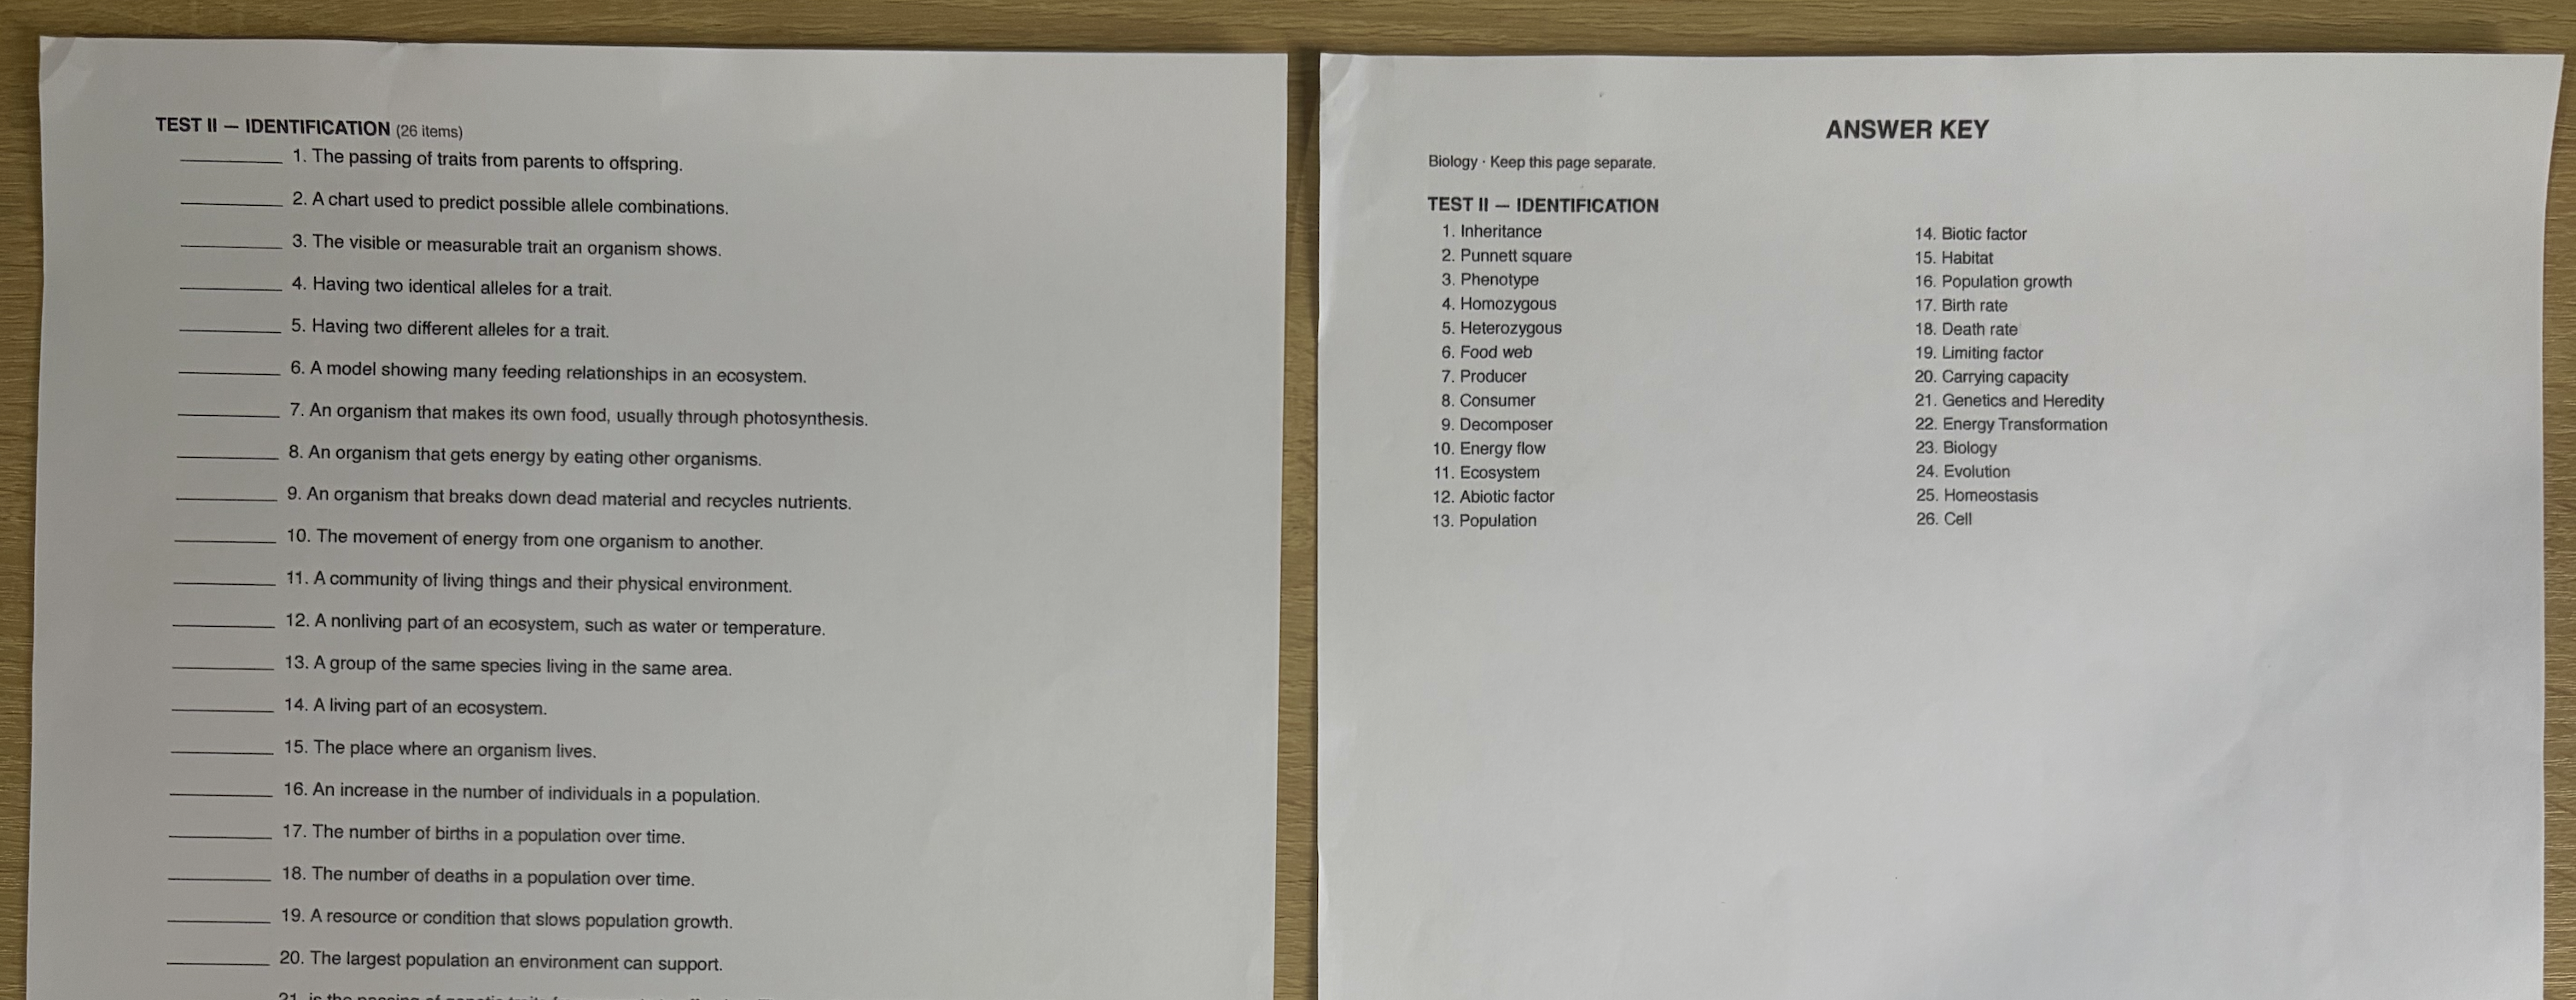
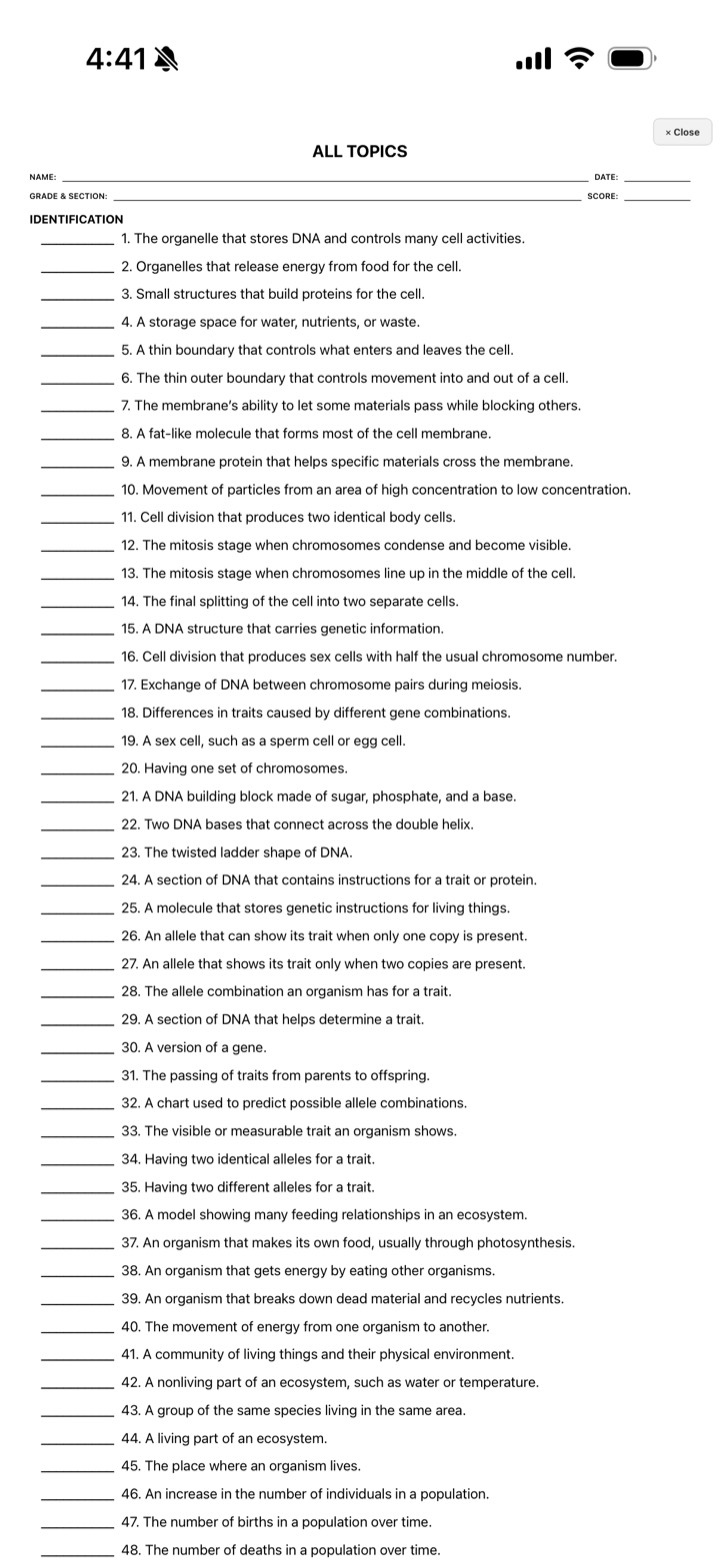
2. An Identification part with its answer key. Keys always print on their own pages at the end, so you can separate them before handing the exam out.
-
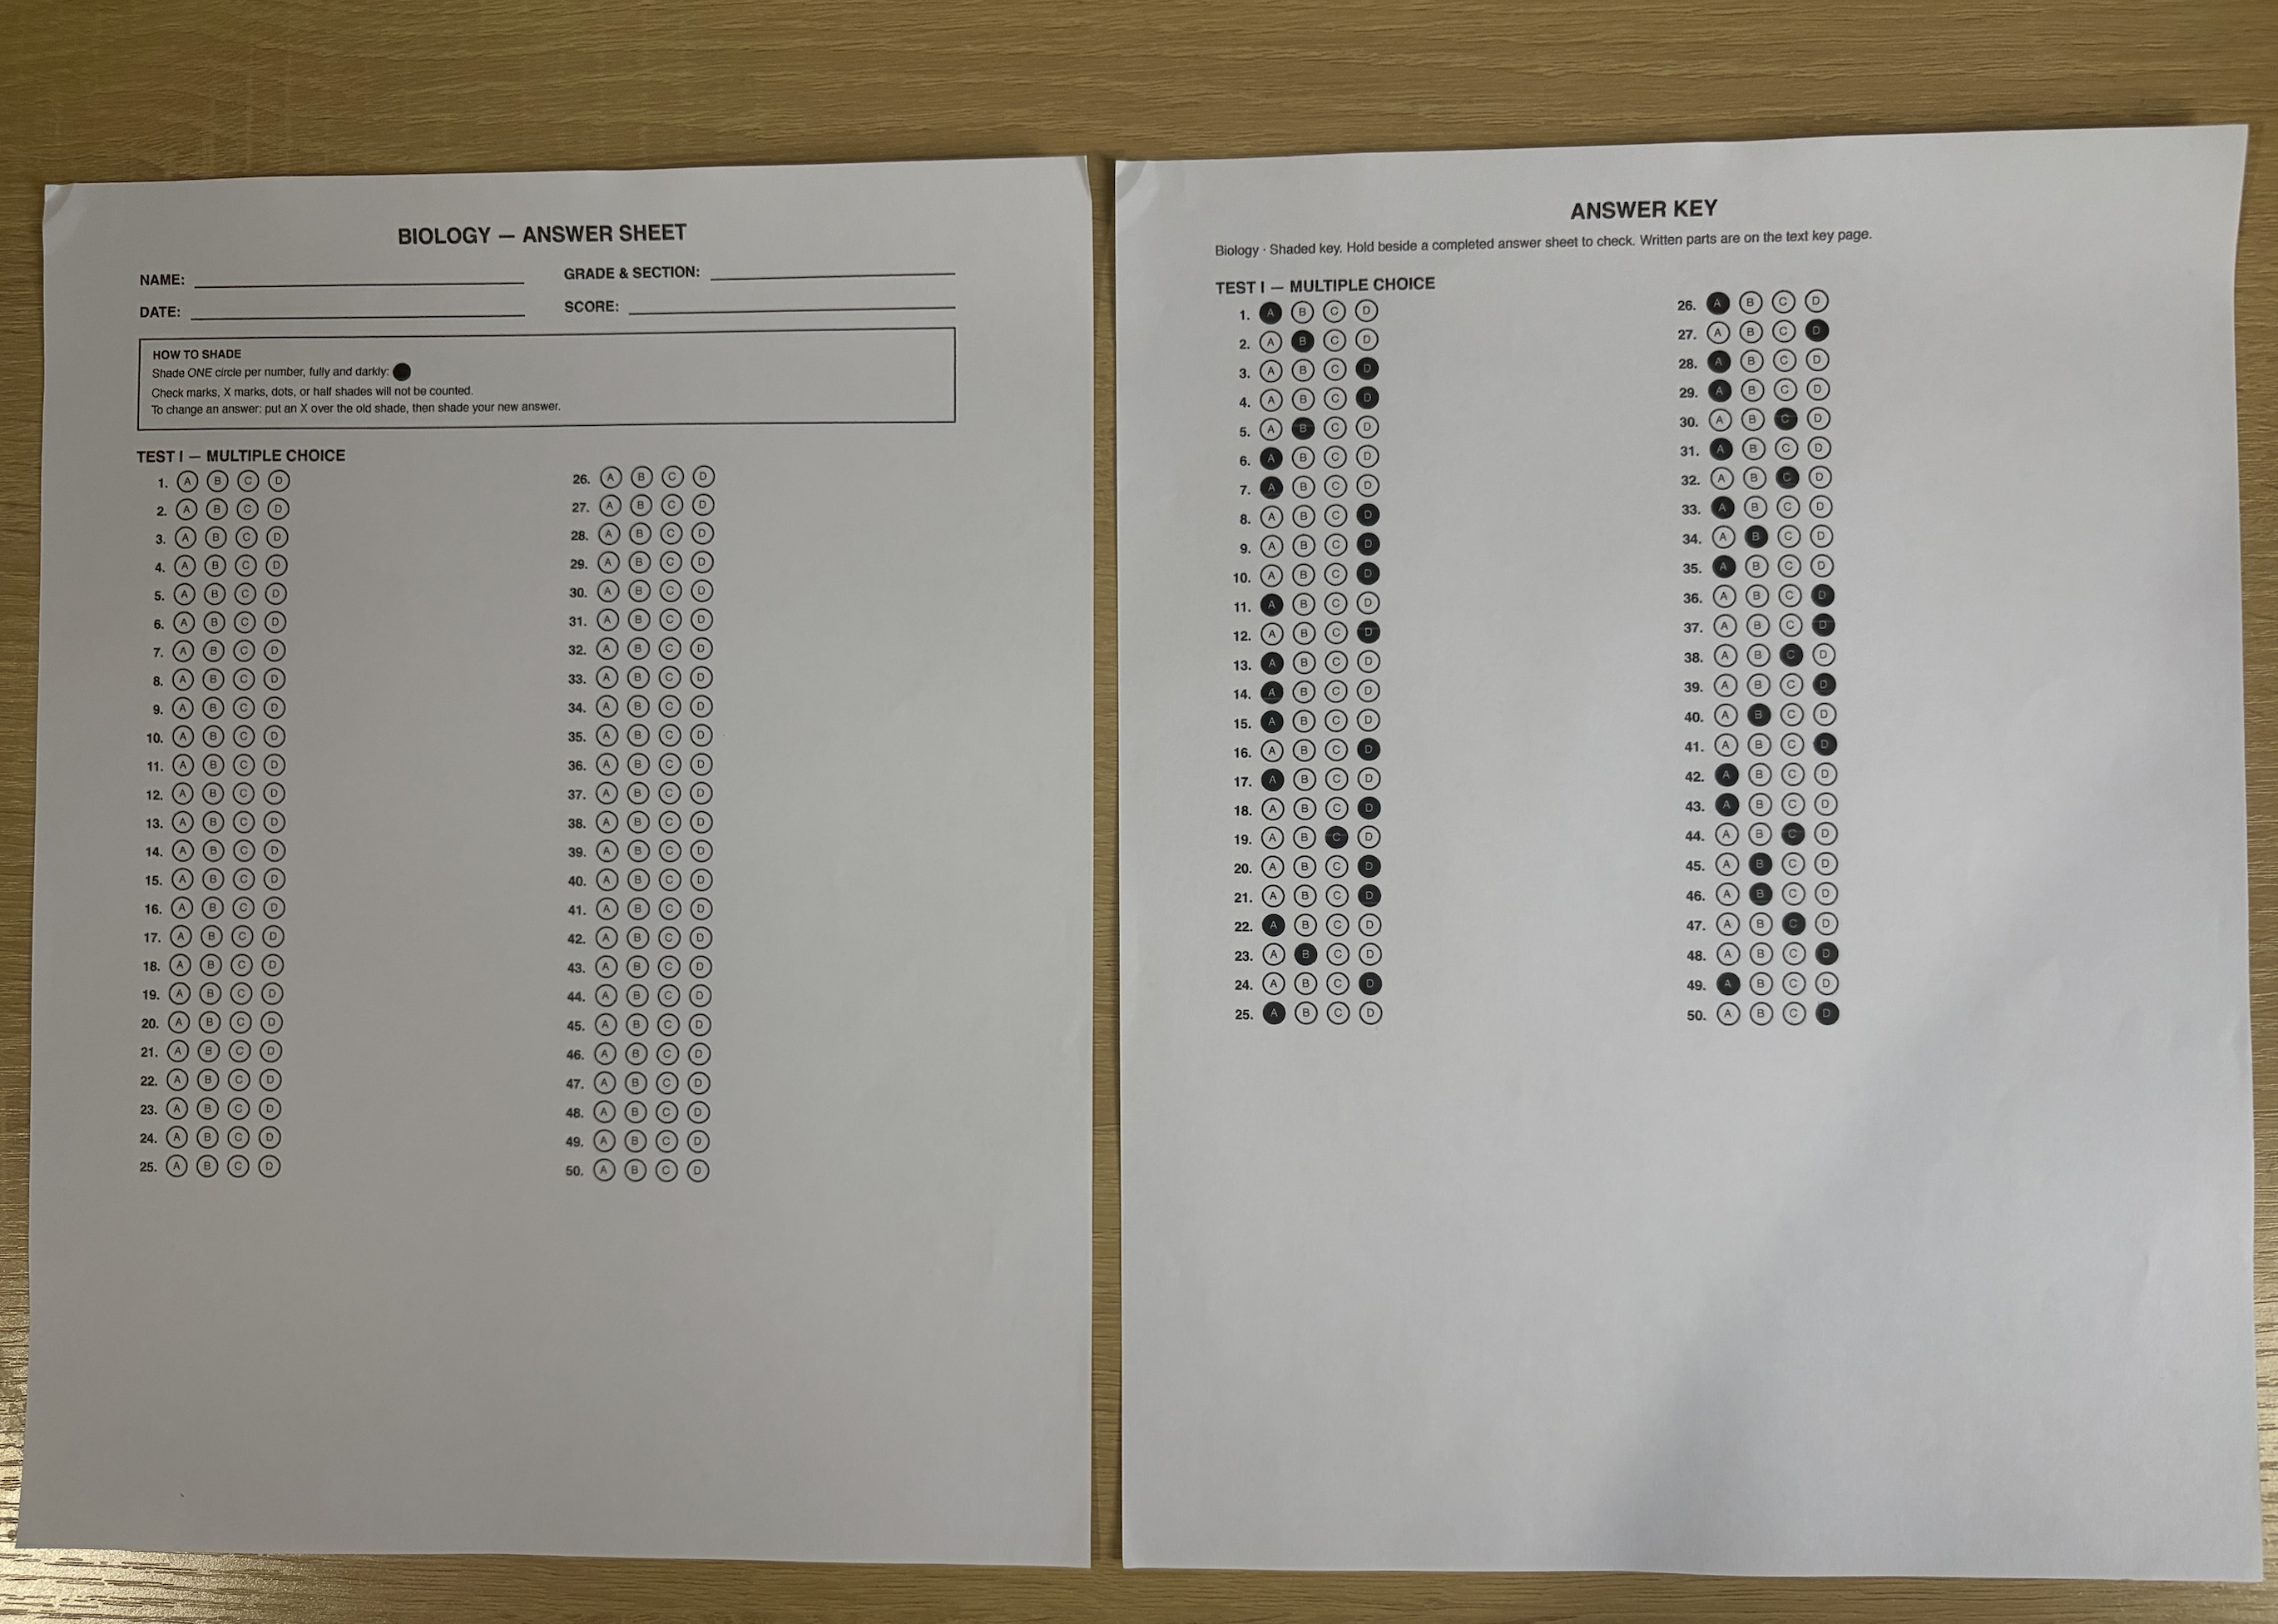
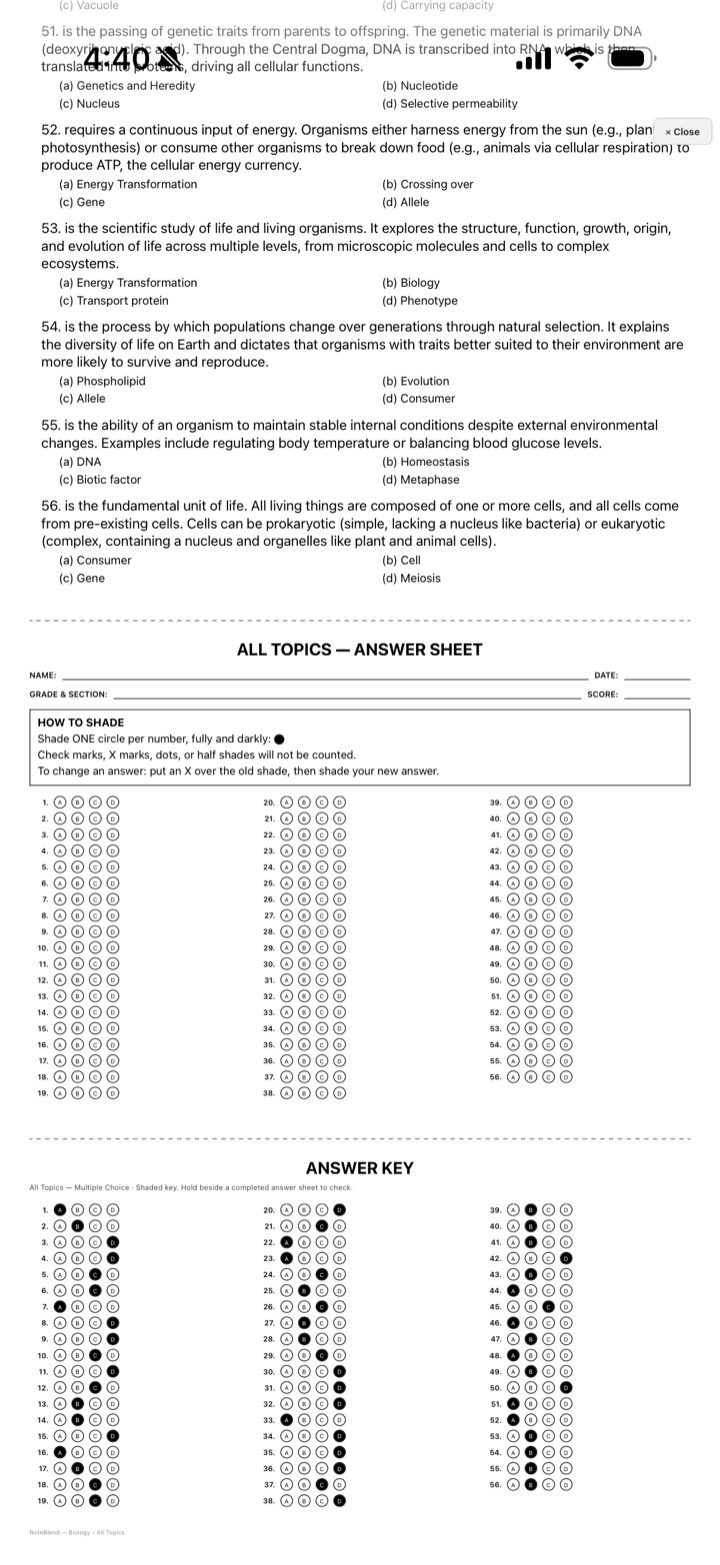
3. A shade-the-circle answer sheet with its shaded key. Hold the key beside a finished sheet to check it by hand — no scanner needed.
More formats
-
Multiple Choice exam
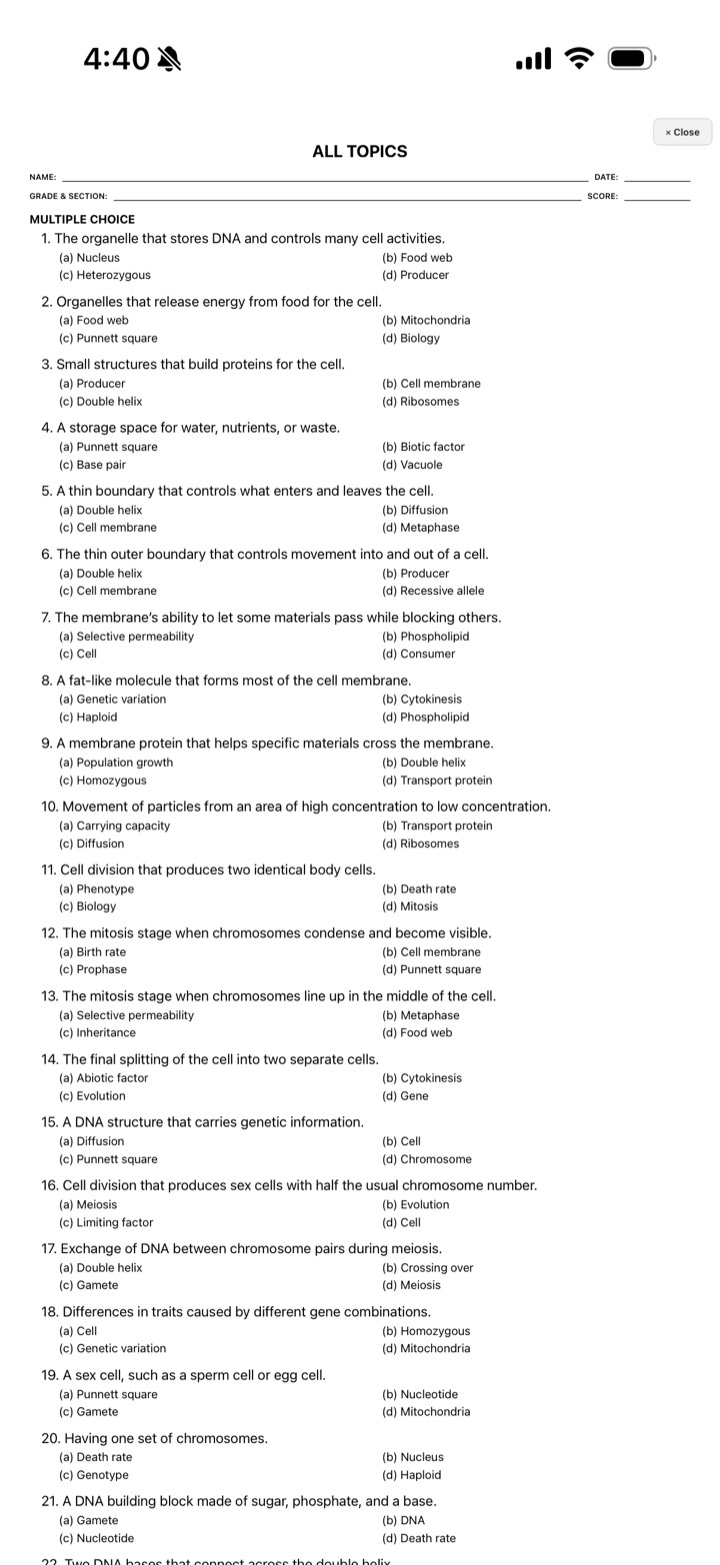
-
Identification exam
-
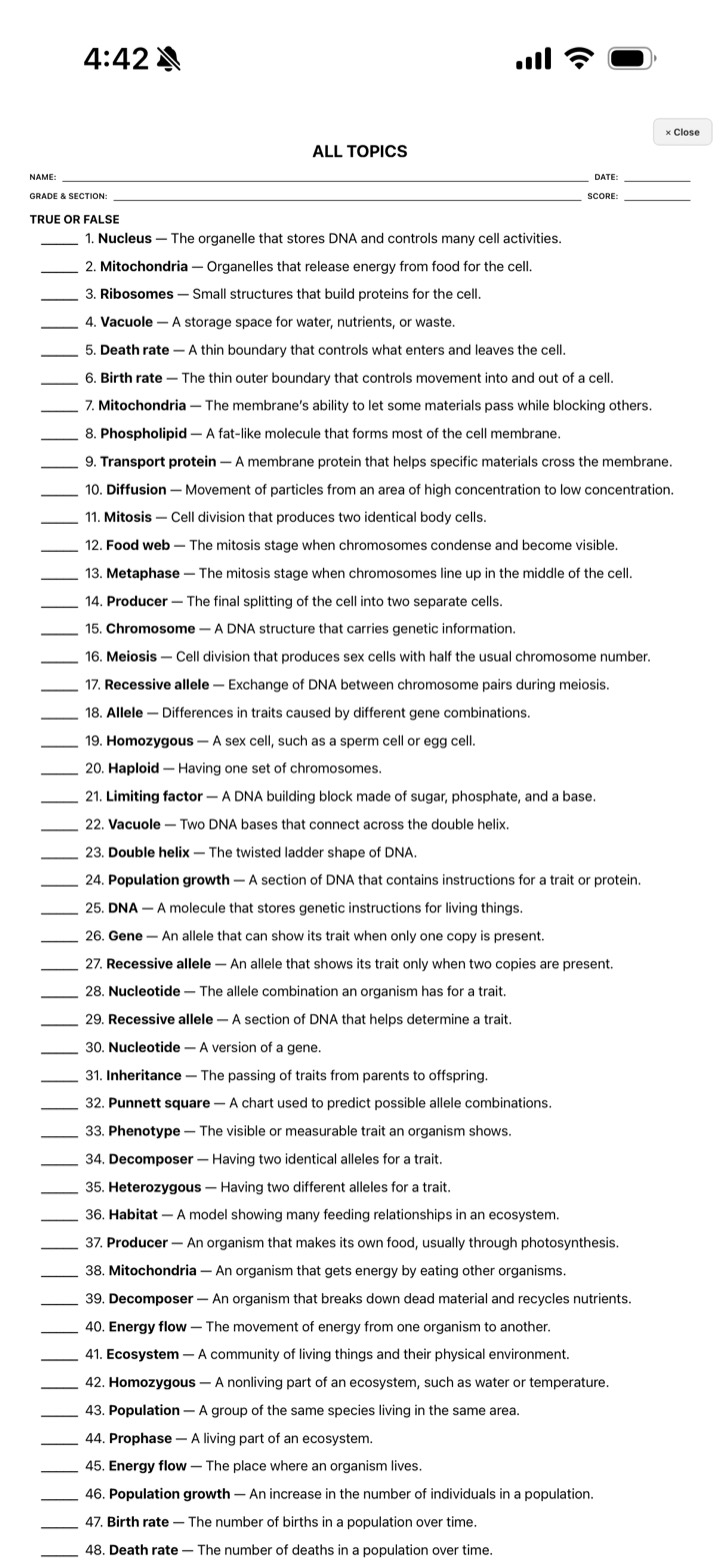
True or False exam
-
Answer sheet and answer key
These are only a few of the formats. Full Access also prints Match Column, Enumeration, and Classification papers, Set A and Set B class sets with different question orders, shade-the-circle answer sheets, and separate answer keys — plus the Exam Builder, which combines several types into one paper (Test I, Test II, Test III) under your own header. Every exam also downloads as an editable Word file you can reuse as your own template. See the How to Unlock tab for the one-time key.