SnapDesk
Every screenshot, in the right folder.
Menu bar app for Mac. Private. No account. No tracking.
Free 7-day trial · macOS 14 Sonoma or later · Apple silicon and Intel. Signed and notarized by Apple — see the Install tab below after downloading.
Installation & User Guide
How SnapDesk works
SnapDesk lives in your menu bar and watches the folder where your Mac saves screenshots. Take a screenshot, pick a folder, done — your Desktop stays clean. No account and no setup needed. Open each section below for a step-by-step guide. It works for designers, students, support teams, and anyone whose Desktop fills up with screenshots.
Take a screenshot and move it
-
1. Take a screenshot the way you always do: ⇧⌘3 for the whole screen, ⇧⌘4 for a selection, or ⇧⌘5 for more options.
-
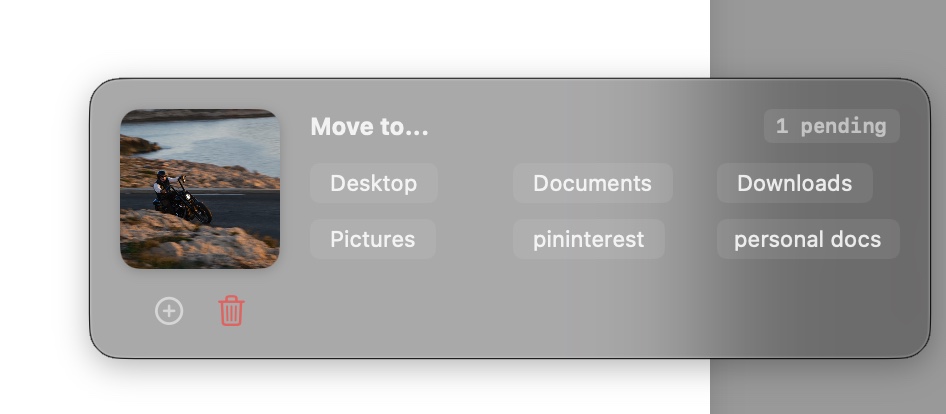
2. The "Move to…" popup appears with a preview of your screenshot. Click a folder, and the screenshot moves there right away.
-
3. Took several screenshots in a row? They wait in line. The counter in the upper-right corner of the popup shows how many are left, like "2 pending".
-
4. Don't need it? Click the red trash icon. The screenshot goes to your Mac's Trash, so you can still put it back.
-
5. Need a new folder? Click +, type a name, and click "Save". The folder is created and shows up in the popup.
Choose what happens to new screenshots
-
1. Click the camera icon in your menu bar and choose "Settings…" (or press ⌘,).
-
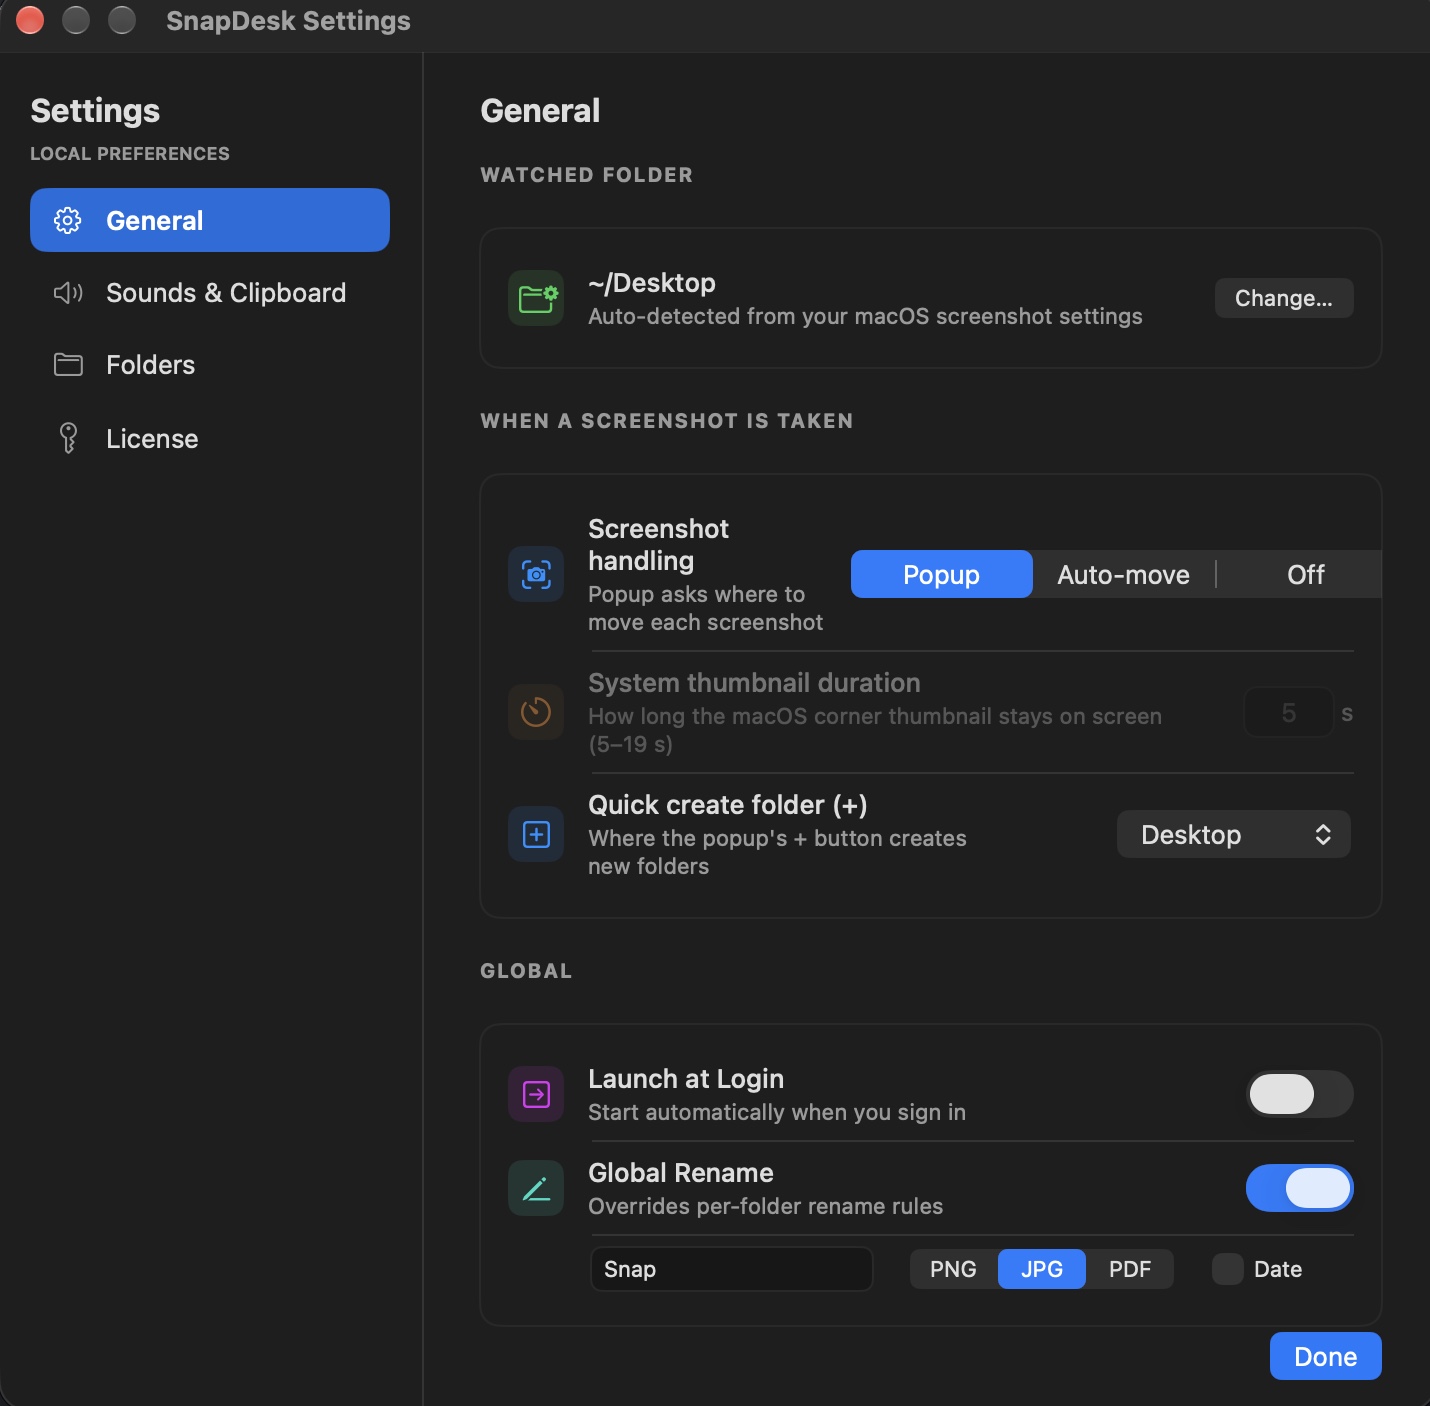
2. In General, under "When a screenshot is taken", pick one:
- Popup — asks where to move each screenshot. This is the default.
- Auto-move — moves every new screenshot to one folder, no questions asked. You pick that folder in the Folders tab.
- Off — SnapDesk leaves screenshots where macOS saves them.
-
3. With Auto-move, you can also set "System thumbnail duration" — how long the little macOS preview stays in the corner of your screen (5 to 19 seconds).
Pause SnapDesk for a while
- Click the camera icon in your menu bar.
- Choose "Pause SnapDesk" (or press ⌘P while the menu is open).
- While paused, SnapDesk doesn't pop up or move anything. Choose "Resume SnapDesk" from the same menu to turn it back on.
Tip: pausing is handy when you're taking lots of screenshots for one task and want to sort them later.
Install SnapDesk on your Mac
SnapDesk is signed and notarized by Apple, so it installs like any app you download from the web. You need macOS 14 Sonoma or later.
-
1. Click "Download for Mac" at the top of this page. SnapDesk.dmg saves to your Downloads folder.
-
2. Open SnapDesk.dmg. In the window that appears, drag SnapDesk onto the Applications folder.
-
3. Open SnapDesk from your Applications folder — not from inside the DMG window.
-
4. macOS asks "SnapDesk is an app downloaded from the internet. Are you sure you want to open it?" Click "Open". This only happens the first time.
-
5. When macOS asks if SnapDesk can access your Desktop folder, click "Allow". SnapDesk needs this to see new screenshots.
-
6. Done! Look for the camera icon in your menu bar, at the top-right of your screen. SnapDesk has no Dock icon — it stays out of your way.
After installing, you can eject the SnapDesk disk (right-click it in Finder → Eject) and delete SnapDesk.dmg from Downloads.
Start SnapDesk when you log in
- Open SnapDesk Settings → General.
- Under Global, turn on "Launch at Login".
SnapDesk now starts quietly every time you turn on your Mac, so you never miss a screenshot.
Update to a new version
- Download the latest SnapDesk.dmg from this page.
- Click the camera icon in your menu bar and choose "Quit".
- Open the DMG, drag SnapDesk onto Applications, and click "Replace".
- Open SnapDesk again. Your folders, settings, and license stay exactly as they were.
Uninstall SnapDesk
- Click the camera icon in your menu bar and choose "Quit".
- Drag SnapDesk from your Applications folder to the Trash.
Good to know: like most Mac apps, SnapDesk keeps your settings after you delete it, so reinstalling brings everything back. Your screenshots and folders are never deleted when you uninstall.
Folders and renaming
SnapDesk starts with your four main Mac folders. Add your own folders for projects, clients, or classes, and let SnapDesk rename screenshots so they're easy to find later.
Default and custom folders
-
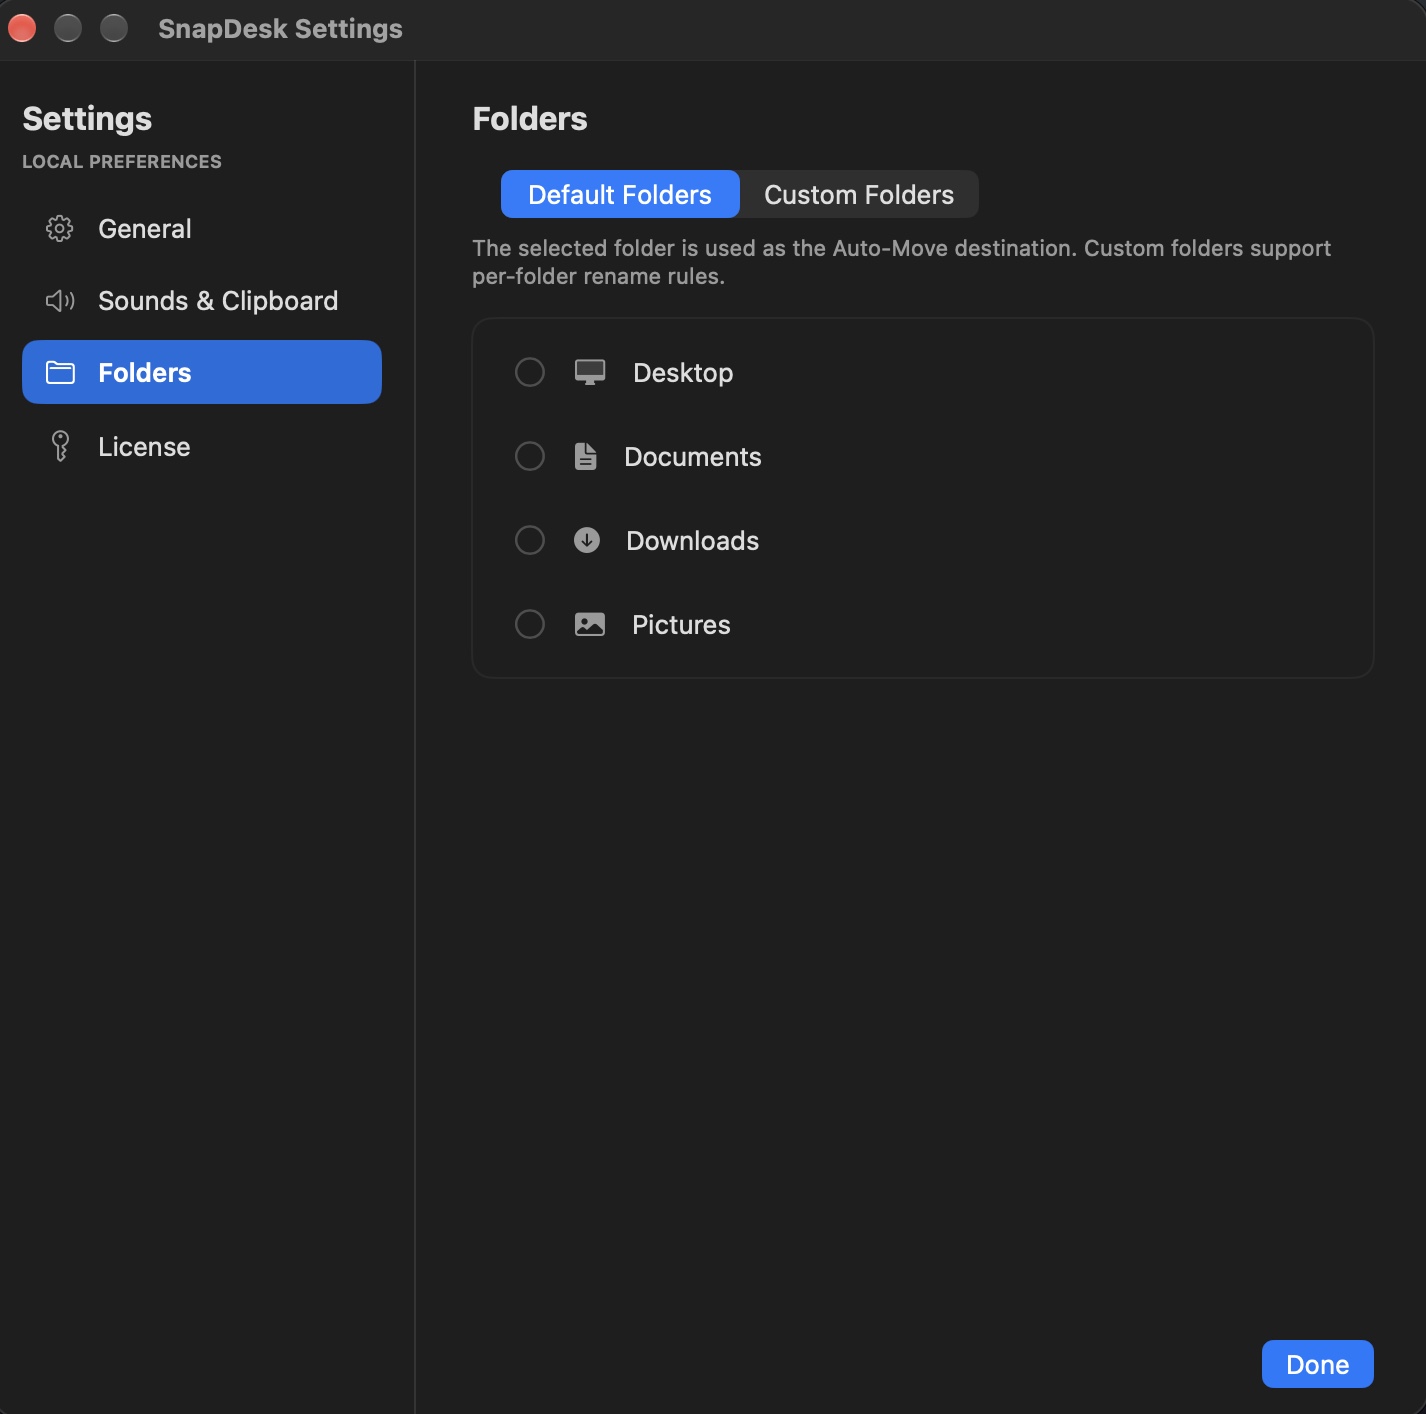
1. Open Settings → Folders. Default Folders lists Desktop, Documents, Downloads, and Pictures. The folder you select here is where Auto-move sends screenshots.
-
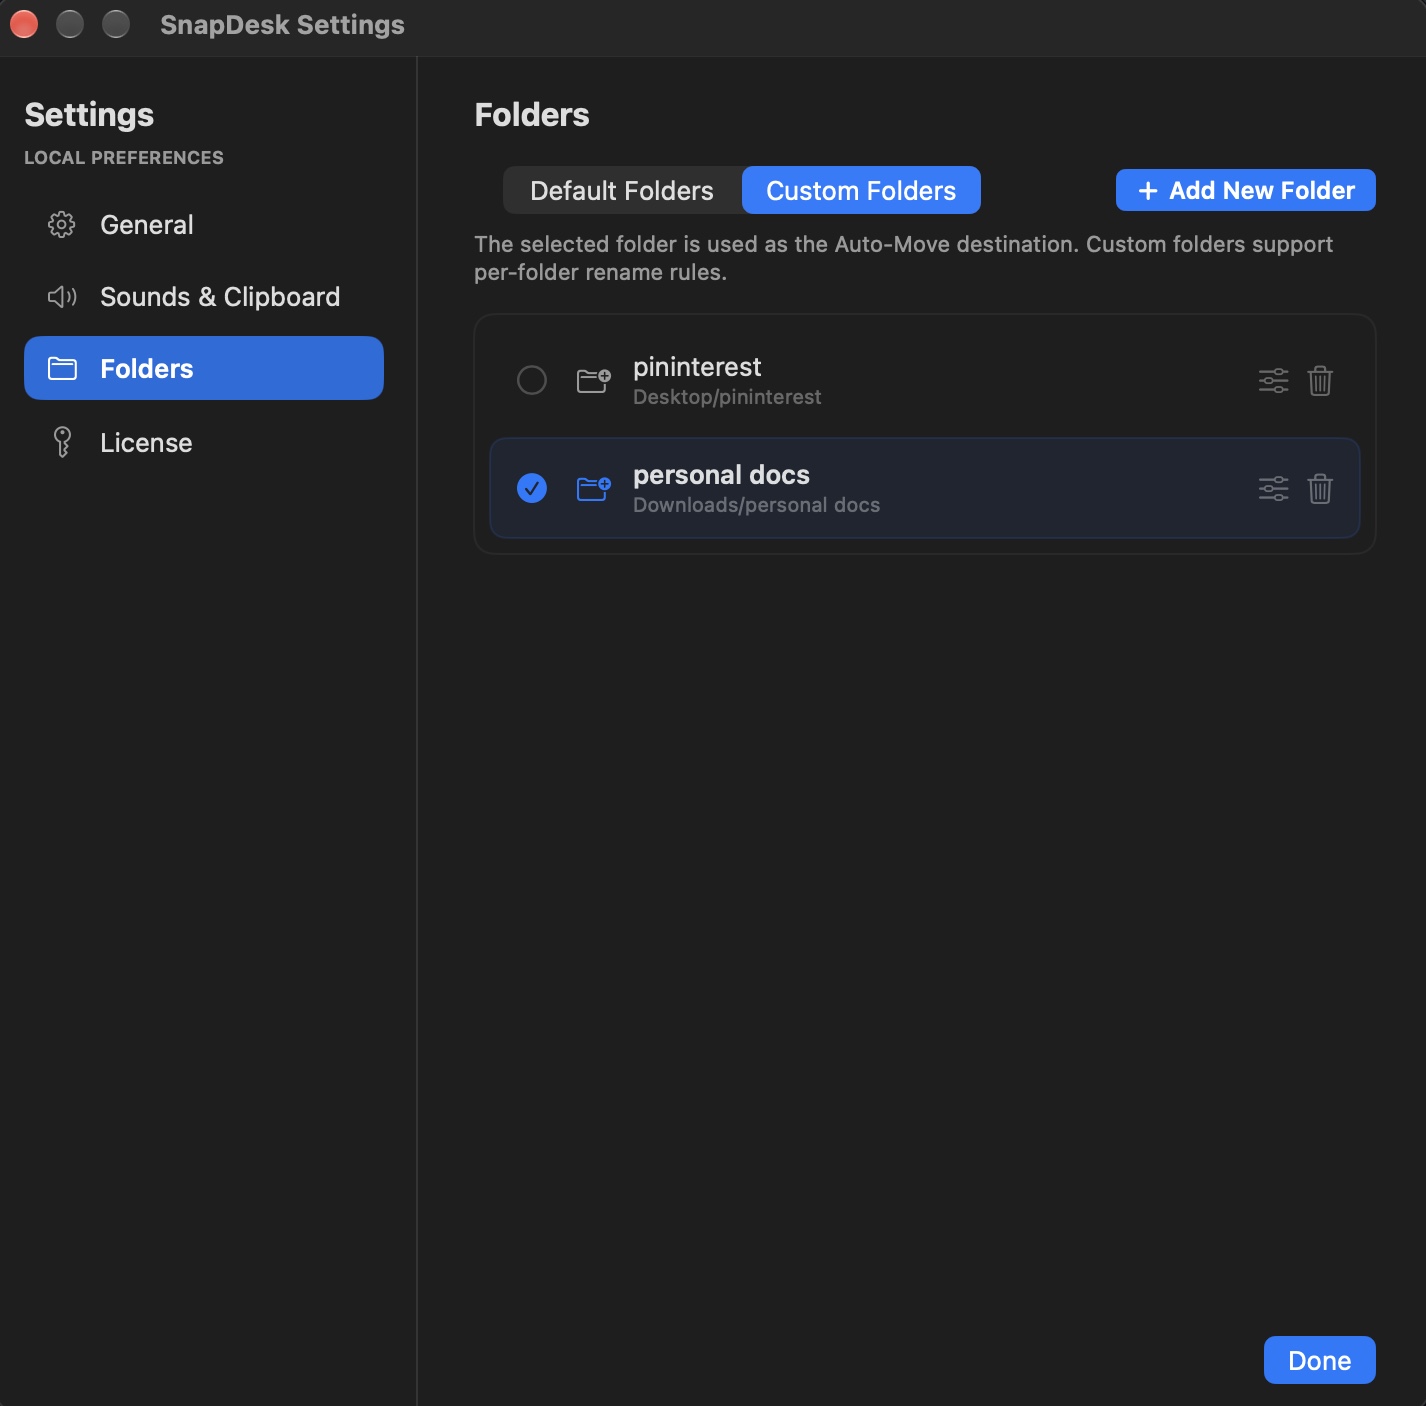
2. Switch to Custom Folders and click "Add New Folder". Type a name and choose where to create it (Desktop, Downloads, Documents, or Pictures).
-
3. Your new folder shows up in the "Move to…" popup right away. Select it here if you want Auto-move to use it.
Note: clicking the trash icon next to a custom folder moves the real folder and everything inside it to your Mac's Trash. You'll be asked to confirm first. Changed your mind? Open the Trash and choose Put Back.
Rename screenshots automatically
Instead of "Screenshot 2026-11-07 at 5.07.04 PM.png", SnapDesk can give your screenshots short, tidy names like Invoice_001.png or Lecture_2026-11-07_001.jpg. There are two ways to set it up:
One rule for everything (Global Rename)
- Open Settings → General and turn on "Global Rename".
- Type a prefix (the start of the file name), pick a format — PNG, JPG, or PDF — and tick Date if you want today's date in the name.
- Every screenshot you move now gets that name. Global Rename overrides any per-folder rules.
A different rule for each folder
- In Settings → Folders → Custom Folders, click the sliders icon next to a folder.
- Set its prefix, format, and Date option.
- Want to rename the files already in that folder too? Click "Change" and confirm. SnapDesk renames them when you click "Done".
Good to know: choosing JPG makes smaller files that are easy to send by chat or email. PDF is handy for receipts and documents you want to print or attach.
Create a folder from the popup
- When the "Move to…" popup appears, click +.
- Type a folder name and click "Save". The folder is created and added to your custom folders.
- To choose where these folders are created, open Settings → General → "Quick create folder (+)".
Save clipboard screenshots
Adding Control to the screenshot shortcut — ⌃⇧⌘3 or ⌃⇧⌘4 — copies the screenshot to your clipboard instead of saving a file. It's great for pasting into chats, but the picture is gone once you copy something else. SnapDesk can keep a copy for you.
- Open Settings → Sounds & Clipboard.
- Turn on "Sync to Clipboard Folder" and choose Desktop, Downloads, Documents, or Pictures.
- Take a clipboard screenshot. SnapDesk saves a copy in a ClipBoard folder there and shows "Saved to ClipBoard Folder".
The screenshot also stays on your clipboard, so you can still paste it anywhere like before. While this is on, SnapDesk saves images that land on your clipboard (like clipboard screenshots). Copied text and files (⌘C) are never saved.
Sound cues
Sounds are off by default. Turn them on in Settings → Sounds & Clipboard:
- Popup sound cue — plays when SnapDesk spots a new screenshot.
- Clipboard sound cue — plays when a clipboard screenshot is saved.
The popup doesn't appear
Check these, in order:
- Click the camera icon in your menu bar. If it says "Resume SnapDesk", SnapDesk is paused — click it.
- In Settings → General, make sure "Popup" is selected.
- Look at Watched Folder at the top of General. It should be green. If it's red, see the next section.
- See two camera icons in your menu bar? Two copies of SnapDesk are running. Quit one of them.
- If the menu says "Trial ended", see the How to Unlock tab.
Watched Folder says "No permission"
This means macOS is blocking SnapDesk from your screenshot folder — usually because "Don't Allow" was clicked by accident. To fix it:
- Open System Settings → Privacy & Security → Files & Folders.
- Find SnapDesk and turn on Desktop Folder (or the folder where your screenshots go).
- Quit SnapDesk from the menu bar and open it again.
You can also click "Change…" next to Watched Folder in SnapDesk and select the folder again — macOS will ask for permission once more.
My screenshots save somewhere else
SnapDesk automatically finds where your Mac saves screenshots. If you changed that location (in ⇧⌘5 → Options → Save to), quit and reopen SnapDesk so it picks up the new folder.
Prefer to choose the folder yourself? Open Settings → General, click "Change…" next to Watched Folder, and pick it. Click "Auto-Detect" to go back to automatic.
Still stuck?
Message Support with your macOS version and a short description (a screenshot helps). We'll get back to you.
How the free trial and unlock work
SnapDesk starts with a 7-day free trial of everything — no account, no email, and no card needed. Try the popup, Auto-move, custom folders, rename rules, and clipboard saving.
After the trial, SnapDesk stops moving new screenshots until you add a license. Your screenshots and folders are never touched — everything SnapDesk already moved stays right where it is. A one-time license keeps SnapDesk working for good.
Price
SnapDesk License
$9.99
One-time · lifetime license
- Every feature: popup, Auto-move, custom folders, rename rules, and clipboard saving
- Use on up to 3 Macs
- Works offline after activation
- 14-day money-back guarantee
One-time payment — no subscription, no account, no renewals. Secure checkout by Gumroad.
How to unlock
-
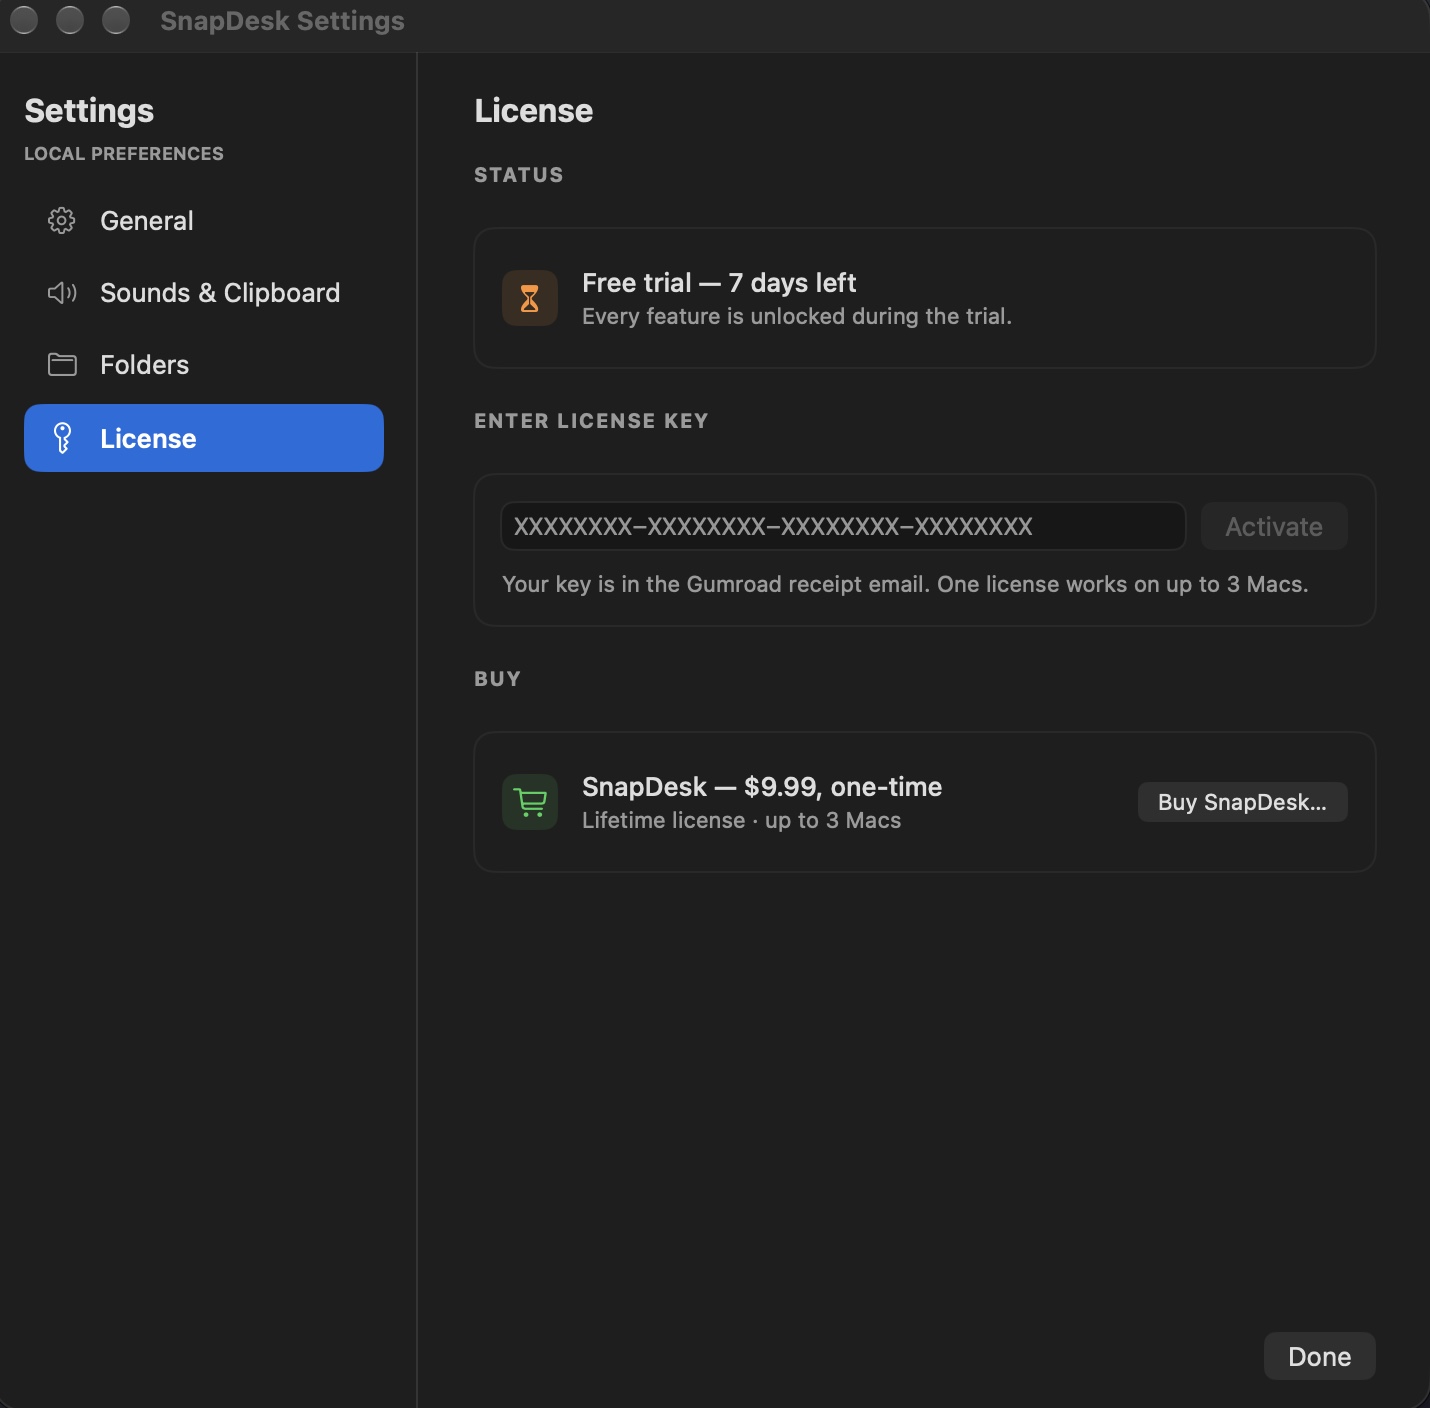
1. Click "Buy SnapDesk" on this page, or in SnapDesk open Settings → License → "Buy SnapDesk…". Checkout is handled by Gumroad.
-
2. After paying, your license key appears on the receipt page and in your email. It looks like XXXXXXXX-XXXXXXXX-XXXXXXXX-XXXXXXXX.
-
3. In SnapDesk, open Settings → License. Paste your key and click "Activate".
-
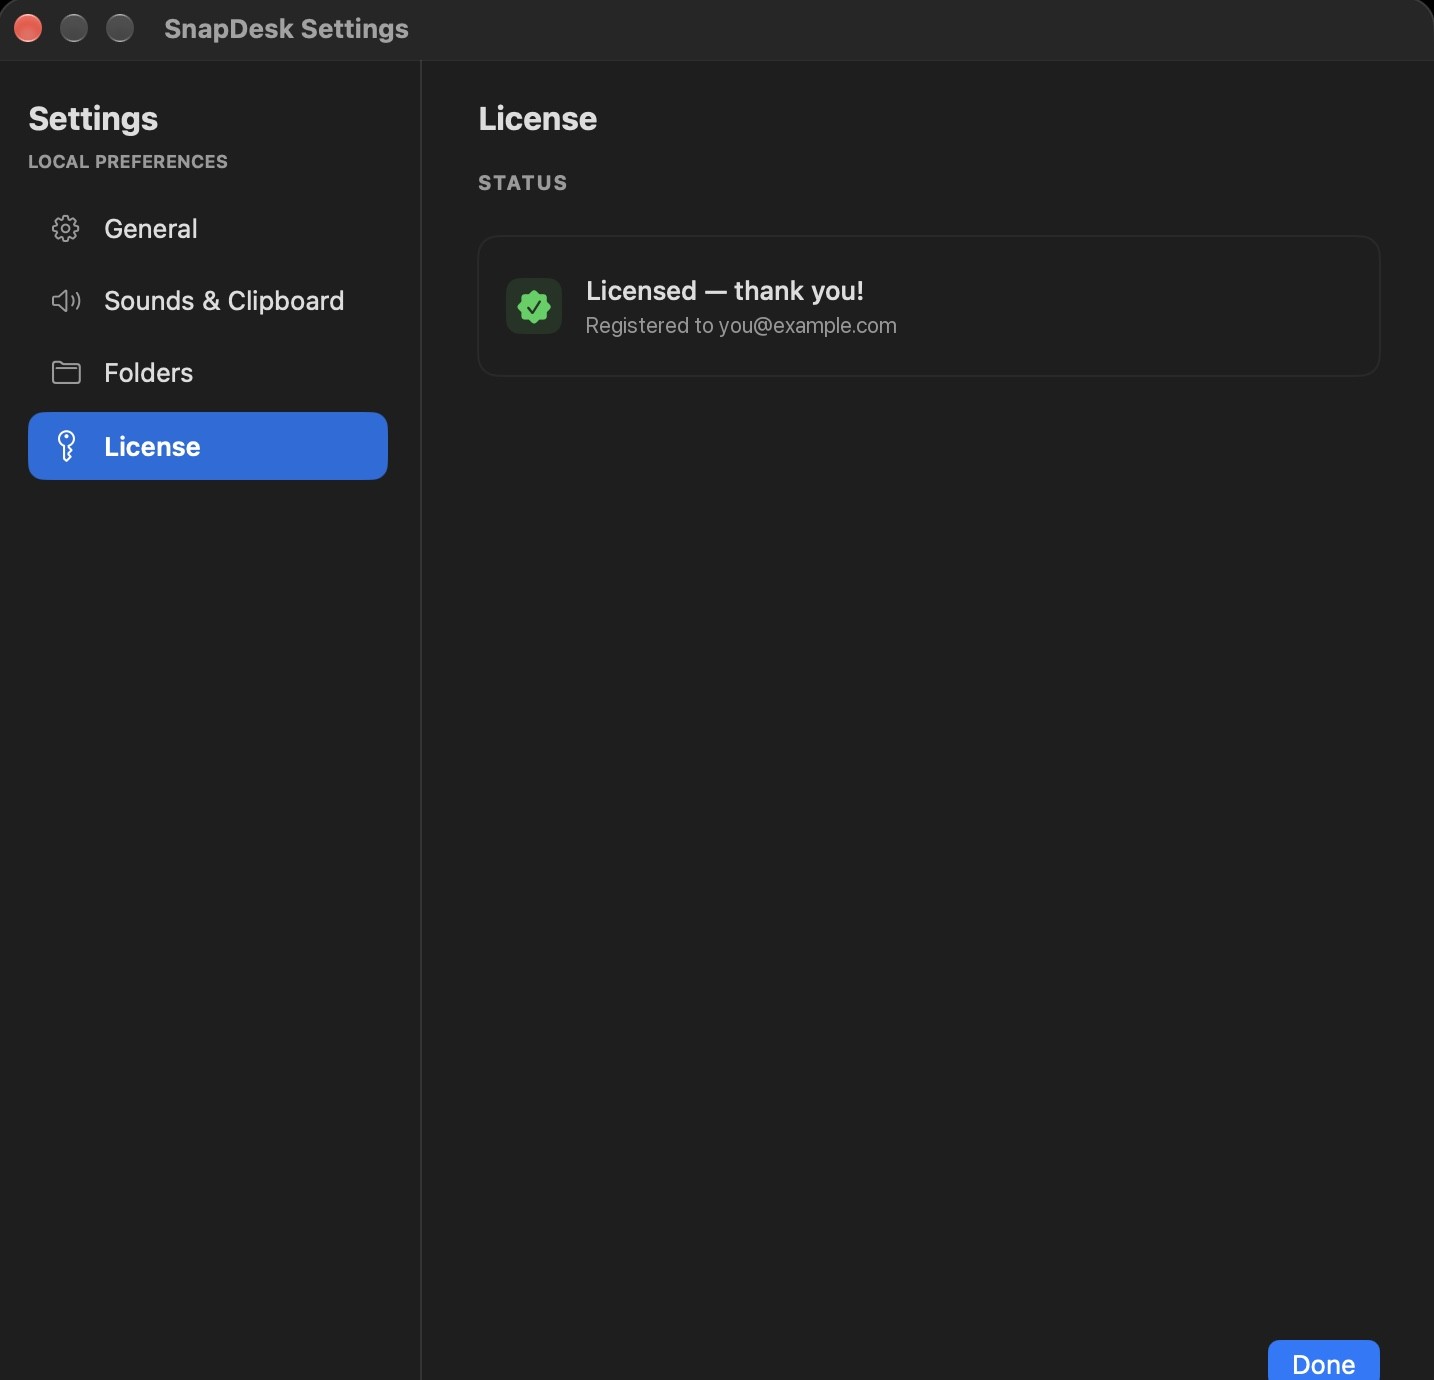
4. Done! You'll see "Licensed — thank you!". You only need internet for this step — after that, SnapDesk works offline.
Good to know before you buy
One license, up to 3 Macs. Each Mac you activate counts once. Reinstalling or updating SnapDesk on the same Mac keeps your license, so it doesn't use up another one. Moving to a new Mac and out of activations? Message Support and we'll help.
Lost your key? Search your email for your Gumroad receipt for SnapDesk — the key is inside. You can also message Support.
Private by design. Activating sends only your license key to Gumroad to check it. SnapDesk never uploads your screenshots, files, or folder names anywhere.
Note: a refunded license stops working, and SnapDesk goes back to needing a license.